
This is the second workshop in the App Preferences Workshop series, you will learn how to add preferences in the Root.plist file. Preferences you add in the plist file are for demonstration purpose only. In a real-world application, preferences you add in the plist file will be tailored for the iOS application.
Create The Login Info Group Header
The first thing you need to do is click the Root.plist file to open it in Xcode’s Standard code editor. You need to display the default preferences’ keys in their raw format. Just right-click a blank area in the code editor window and select Show Raw Keys/Values from the pop up menu.
Now, remove all items except Item 0 under the PreferenceSpecifiers column. Just click an item to select it then press the Delete key. Click the little arrow to the left of Item 0 to expand it. As you can see in the image below, two keys are listed under the Key column: Type and Title. I want you to enter “Login Info” for the Title key. You will have to double-click in the box under the Value column to enter the title. When you are done, the plist file should look like this:

Now, click the little arrow to the left of Item 0 again, to collapse it. Run the application, then go to the Simulator’s Home window. Launch the Settings application, then click the UserPreferences entry to view result of the preference you just created in the Root.plist

Create The Login Info Group Preferences
You need to create two preferences for the Login Info. Start by doing the following to create the first preference, Username. Control-click Item 0. After selecting Add Row from the menu, Item 1 is added in the plist file.

Click the little arrow to the left of Item 1 to accept the default option (Text Field) shown in the pop-up menu.

Enter text shown in the the image below for the Title and Key PreferenceSpecifiers.

Now you’ll set the DefaultValue of the Username preference. Follow instructions shown in this image.

Enter merlynweb in the Value column. The plist file should now look like this.

You need to create the password preference. First close Item 1, if you haven’t done so, then control-click Item 1 and select Add Row from the menu. Now, open Item 2 and enter text shown in this image for the Title and Key PreferenceSpecifiers.

Now, you need to add a secure key for the password. Start by clicking the + sign to the right of the Key item. Next, select IsSecure from the pop-up menu, instead of DefaultValue. Next, enter YES in the Value column. When you are done, Item 2 should look like this before closing it.

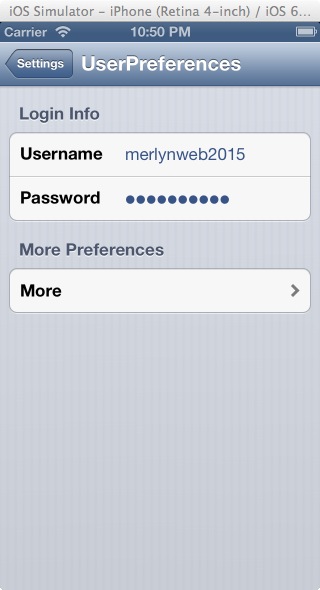
View The Login Info Settings
The “Login Info” group is complete. Now is a good time to view it in the Settings application. First, run the UserPreferences application, then launch the Settings application. Click the UserPreferences item to view the settings you’ve added in the Root.plist file so far. Feel free to change the Username and Password values if you wish.

Create The Child Preference
Now you will create a second group and add a single preference under it. Start off by returning to the Root.plist file and close Item 2, if you haven’t already done so. Control-click Item 2 and select Add Row from the pop-up menu. Select Group from the pop-up menu. Expand Item 3, enter text shown in this image for the Title key, then collapse Item 3.

Create The More Group Preference
The final preference you’ll add in the Root.plist file will point to the More.plist file’s preferences. Start by adding a new row and follow instructions shown in this image to change its Type.

Once you change Item 4’s Type, enter text shown in this image for the Title and Key.

Once you’ve entered text for the Key item, follow instruction shown in this image to add the File item.

Images below shows what Item 5 should look like in the editor and the Settings application.

Here’s what the Root.plist file’s preferences should look like in the Settings application.
The More.plist File
When the user tap the More preference item shown in the Settings application, preferences you’ll add in the More.plist file will show up in the iPhone Simulator. With that said, I want you to click the More.plist file to load it in the code editor. Control-click a blank area in the editor and select Show Raw Key/Values from the pop-up menu. Now, add PreferenceSpecifiers shown in Figure A. Figure B shows what they will look like in the Settings application.
 Figure A |
 Figure B |
![]() That’s all for this week’s workshop; next week, you will add code in the AppDelegate files to set up the application’s data model, design and code the Book List tab’s user interface. Until then, happy coding! 🙂
That’s all for this week’s workshop; next week, you will add code in the AppDelegate files to set up the application’s data model, design and code the Book List tab’s user interface. Until then, happy coding! 🙂