
In this workshop, I introduce you to the main tools of Apple’s Software Development Kit (SDK) used for developing applications that runs on Apple’s hand-held devices. The lesson following this one, I discuss sub-components of the SDK.
In previous lesson of the “Read This First” area of The App Lady website, you learned how to create and run your first iOS application, DemoApp. As you saw, creating an application for Apple’s iOS platform is no easy task. You used Apple’s Software Development Kit (SDK) to create the DemoApp. Components of the SDK consist of three applications: Xcode, Interface Builder, and the iOS Simulator, as shown in Figure 1.

Figure 1: Components of Apple’s SDK
1. Xcode
Xcode is the first component of Apple’s SDK, it is a powerful Integrated Development Editor (IDE) used for creating two types of applications as shown in Figure 2.
Figure 2: Template selection dialogue menu
When you create a new project, Xcode place it in a Workspace, as shown in Figure 3 below. The Workspace enables you to use sub tools of the SDK-see Figure 1 above. As you can see in Figure 3 below, Xcode’s Workspace consist of five main areas. Since you will be spending 90% of your time Xcode’s workspace, it makes sense to review areas highlight in Figure 3 below.

- Figure 3: Xcode’s Workspace

ToolBar
The Run button launches the iPhone or iPad on your monitor, which loads the app’s Graphical User Interface you created in Interface Builder.
The Stop button stop running your app in the Simulator so you can continue working on your app in the Workspace.
The Scheme is really two menus and this image shows items you can select from them.
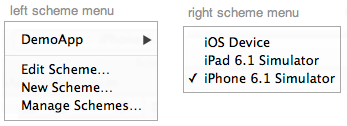
Figure 4: Scheme menu items
The large rectangle area in the middle of Xcode’s Toolbar is the activity viewer and it shows the progress of a task that’s currently executing, status messages, build progress, and other information about your project. You can click yellow and red issue icons displayed in this area to open the Issues navigator.
Views
The set of buttons shown in the Toolbar’s Views area enables you to show/hide various views. Take a look at images show in Figure 5 below to see what I mean.

- Figure 5: The Views buttons
Navigator
The Navigator area list folders and files of the current project you are working on, as shown in Figure 6 below. The green circle in Figure 6 shows the Toolbar button you can use to show/hid the Navigator. By the way Xcode calls applications you create for the Mac OSX platform or iOS platform projects.

- Figure 6: Xcode Navigator area

I will only discuss content of the DemoApp folder (yellow folder icon) and the Frameworks folder.
The DemoApp folder contain the project’s class files and NIB files. A class file comes in two parts:
h files: Files with this prefix are called header or interface files. They contain code to define property variables and methods.
m files: Files with this prefix are called implementation files. They contain code to implement methods you defined in the header file. When you go through the step of creating a new project, the template you selected adds methods in the implementation file and you can write code in them.
Editor
Content in the Editor area changes, depending what you are doing.
Utilities
Content in the Utilities area changes, depending what you are doing. For example, click the DemoApp’s NIB file, then a header file to see how the Utilities panel change.
2. Interface Builder
Interface Builder (IB) is the second application of the SDK. Ii is a Graphical User Interface (GUI) application that is built right into Xcode. Xcode automatically loads a View (NIB) in the Canvas area when you click the file in the Dock area or the Navigator area. IB is used for creating a View’s GUI by dragging objects from the Object Library on the Canvas. IB is also used for connecting IBOutlet properties and IBAction methods to Interface Builder’s Files Owner object, which is located in the Dock area.

- Figure 7: Interface Builder (IB)

3. iOS Simulator
The iOS Simulator is an application you use to test your project’s GUI and code written for it, in the class file. The Simulator works very much like the real device. You can test your application in the iPhone or iPad Simulator by selecting it from the Scheme and looks like this.

- Figure 8: Scheme
The simulator is automatically displayed on your screen when you click Xcode’s Run toolbar button. These images show what a project’s GUI looks like in the iPhone Simulator and iPad Simulator.
|
|


Know you know that you’ve been introduced the main tools of Apple’s Software Development Kit, you should read the next lesson to learn about sub tools of the SDK.