
In last week’s workshop, you learned the basics of using the PickerView control. In this week’s workshop, you will learn how to do the follow:
- Display two components in the PickerView control.
- Populate one component of the PickerView control with text strings; the other with images.
- Display the item the user picked in a TextView control, alone with descriptive text
Design The SecondViewController Interface
To learn how to do above mention tasks, you’ll need to launch the PickerView application in Xcode, then click the SecondViewController.xib file to launch it in Interface Builder.
Currently, the view has only a Label control, displaying the text Second View. You need to add a PickerView control and TextView control on the view, so it look like this in Interface Builder. For the PickerView control, I want you to remove the check mark for the property, User Interaction Enabled.

Next, use the Assistant editor to create and connect IBOutlet property variables (shown below) for the view’s PickerView control and the TextView control. Source code below also shows other property variables you need to add in the file.
SecondViewController.h
#import <UIKit/UIKit.h>

@interface SecondViewController : UIViewController

@property (strong, nonatomic) IBOutlet UIPickerView *pickerView;

@property (strong, nonatomic) IBOutlet UITextView *txtvwShopCart;

@property (strong, nonatomic) NSArray *productPhotoList;

@property (strong, nonatomic) NSArray *productNameList;

@property (nonatomic,strong) NSMutableDictionary *shoppingCartDictionary;
@end
Now is a good time as any to conform the SecondViewController class to the PickerView control’s protocol, via the Connection inspector window.

Implement The PickerView DataSource Methods
Now that you’ve connected the view’s controls and conformed the SecondViewController class to the PickerView’s protocols, I want you to add these dataSource methods of the PickerView control in the SecondViewController.m file.
/* The PickerView control dataSourc methods */
- (NSInteger)numberOfComponentsInPickerView:(UIPickerView *)pickerView
{
  return 2;
}

- (NSInteger)pickerView:(UIPickerView *)pickerView numberOfRowsInComponent:(NSInteger)component
{
  if ([pickerView tag] == 0)
    return self.productNameList.count;
  else
  return self.productPhotoList.count;
}
The Project’s Photos
Download these images and add them in the project’s Supporting Files folder. They contain images you will use in the PickerView control.
Implement The PickerView Delegate Methods
When the user tap the Second View tab, he will see the PickerView control populated with rows in two components and an empty TextView control, as shown in the image below. You will have to implement the reusingView: delegate method of the PickerView control to display rows in both components.

With that said, here’s the code to add in the PickerView’s reusingView: delegate method.
/* The PickerView delegate methods */
- (UIView *)pickerView:(UIPickerView *)pickerView viewForRow:(NSInteger)row forComponent:(NSInteger)component reusingView:(UIView *)view {
  if (component == 0) {
    // return a label
    UILabel *productLabel = [[UILabel alloc] initWithFrame:CGRectMake(0,0,105,32)];
    productLabel.backgroundColor=[UIColor clearColor];
    productLabel.text=[self.productNameList objectAtIndex:row];
    return productLabel;
  } else {
    // return an image
    UIImageView *productImage = [[UIImageView alloc] initWithImage:
    [UIImage imageNamed:[self.productPhotoList objectAtIndex:row]]];
    return productImage;
  }
}
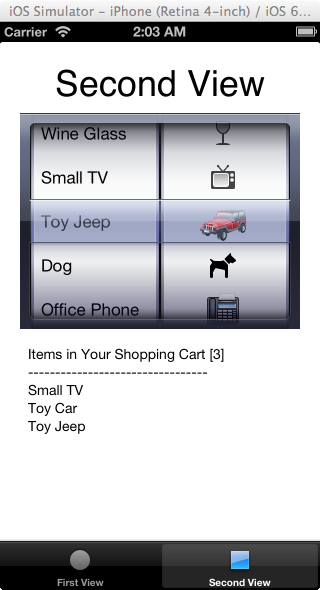
The user scroll component one then pick an item (a row). The PickerView control respond by displaying the item the user picked, along with descriptive text in the TextView control. You will have to implement the didSelectRow: delegate method of the PickerView control to activate the row picking event. Every time the user pick an item from component one, the PickerView update output shown in the TextView control. Say the user picked three items, the TextView control will display output similar to this image.
Here is the code to implement the PickerView’s didSelectRow: delegate method.
-(void)pickerView:(UIPickerView *)pickerView didSelectRow:(NSInteger)row inComponent:(NSInteger)component
{
  // Set up the shoppingCartDictionary object's Key and Value
  NSString *prodName=[self.productNameList objectAtIndex:row];
  NSNumber *photo=[self.productPhotoList objectAtIndex:row];

  if (component==0 && row==0) {
    // The user selected the Toy Car, so add it in the shoppingCartDictionary
    [self.shoppingCartDictionary setObject:photo forKey:prodName];

    // Highlight the rows of both components
    [self.pickerView selectRow:0 inComponent:0 animated:YES];
    [self.pickerView selectRow:0 inComponent:1 animated:YES];

  } else if (component==0 && row==1) {
    // The user selected the Wine Glass, so add it in the shoppingCartDictionary
    [self.shoppingCartDictionary setObject:photo forKey:prodName];

    // Highlight the rows of both components
    [self.pickerView selectRow:1 inComponent:0 animated:YES];
    [self.pickerView selectRow:1 inComponent:1 animated:YES];

  } else if (component==0 && row==2) {
    // The user selected the Small TV, so add it in the shoppingCartDictionary
    [self.shoppingCartDictionary setObject:photo forKey:prodName];

    // Highlight the rows of both components
    [self.pickerView selectRow:2 inComponent:0 animated:YES];
    [self.pickerView selectRow:2 inComponent:1 animated:YES];

  } else if (component==0 && row==3) {
    // The user selected the Toy Jeep, so add it in the shoppingCartDictionary
    [self.shoppingCartDictionary setObject:photo forKey:prodName];

    // Highlight the rows of both components
    [self.pickerView selectRow:3 inComponent:0 animated:YES];
    [self.pickerView selectRow:3 inComponent:1 animated:YES];

  } else if (component==0 && row==4) {
    // The user selected the Dog, so add it in the shoppingCartDictionary
    [self.shoppingCartDictionary setObject:photo forKey:prodName];

    // Highlight the rows of both components
    [self.pickerView selectRow:4 inComponent:0 animated:YES];
    [self.pickerView selectRow:4 inComponent:1 animated:YES];

  } else if (component==0 && row==5) {
    // The user selected the Office Phone, so add it in the shoppingCartDictionary
    [self.shoppingCartDictionary setObject:photo forKey:prodName];

    // Highlight the rows of both components
    [self.pickerView selectRow:5 inComponent:0 animated:YES];
    [self.pickerView selectRow:5 inComponent:1 animated:YES];

  } else if (component==0 && row==6) {
    // The user selected Flowers, so add it in the shoppingCartDictionary
    [self.shoppingCartDictionary setObject:photo forKey:prodName];

    // Highlight the rows of both components
    [self.pickerView selectRow:6 inComponent:0 animated:YES];
    [self.pickerView selectRow:6 inComponent:1 animated:YES];
  }
  // Convert the dictionary's keys to strings
  NSString *textProdNames = [[self.shoppingCartDictionary allKeys componentsJoinedByString:@"\n"];

  // Display content of the shoppingCartDictionary in the TextView control, along with the number items in it
  self.txtvwShopCart.text = [NSString stringWithFormat:@"Items in Your Shopping Cart [%i]\n---------------------------------\n%@",[self.shoppingCartDictionary count],textProdNames];
}
Code in above method is lengthy but if you read comments and look at above image, you should have no problem understanding the source code.
Add Code in The ViewDidLoad Method
The PickerView control data source consist of two NSArray methods and you declared them in the SecondViewController interface file. Now, you need to initialize both of them in the SecondViewController file’s viewDidLoad method. It is a good idea to initialize the shoppingCartDictionary property variable as well.
- (void)viewDidLoad
{
  [super viewDidLoad];
  // Initialize array property variables
  self.productNameList = @[@"Toy Car",
  @"Wine Glass",
  @"Small TV",
  @"Toy Jeep",
  @"Dog",
  @"Office Phone",
  @"Flowers"];

  self.productPhotoList = @[@"redcar_icon.png",
  @"87-wine-glass.png",
  @"70-tv.png",
  @"jeep.png",
  @"dog.png",
  @"office-phone.png",
  @"flowers-icon.png"];

  // Initialize the dictionary property variables
  self.shoppingCartDictionary = [[NSMutableDictionary alloc] init];
}
Add Code in The ViewDidAppear Method
To highlight the third row in both components of the PickerView control, I want you to add this method in the SecondViewController.m file. By the way, this method’s code is fired just before the view is loaded in the simulator window.
- (void) viewDidAppear:(BOOL)animated {
  // Set components' rows to highlight
  [self.pickerView selectRow:2 inComponent:0 animated:YES];
  [self.pickerView selectRow:2 inComponent:1 animated:YES];
}
Run The Application
You’ve entered necessary code to make the SecondView’s interface useable. Run the application to test the SecondViewController’s PickerView control.
![]() That’s it for this week’s workshop. In next week’s workshop, you will learn how to display images and text in a single component of a PickerView control. Until then, happy coding. 🙂
That’s it for this week’s workshop. In next week’s workshop, you will learn how to display images and text in a single component of a PickerView control. Until then, happy coding. 🙂