
The SQL DELETE commandt removes one or more records from a table in your database. It has this general sytax:
DELETE FROM table_name WHERE condition
Example 1
Say you’ve added an employees table in the VintageDatabase file and inserted these records in it.

Now, you want to delete the third record from the employees table. To do that, you’d have to prepare, bind, execute, and finalize this sqlStatement.
const char *sqlStatement = "DELETE FROM employees WHERE empId = ?";
If you didn’t specify a WHERE clause in the sqlStatement, all records in the employees table will be deleted.
Delete Records From The itemsOwned Database File
Now that you’ve been introduced to the SQL DELETE command, you will use it in the SqliteDatabase application to enable the app user to delete rows from the application’s itemsOwned database and the Master View’s Table View control. I assume the application’s Table View control and the database’s possessions table contain rows shown in these images:
In order for the operator to delete a row from the view’s Table View control and the database’s possessions table, you’ll have to execute steps laid out below.
Step 1: Add Code in The AppDelegate Class Files
Declare and implement this method in the AppDelegate class, which delete a record from the database’s possessions table.
- (void)deletePossession:(const char *)itemName
{
  const char *sqlStatement = "DELETE FROM possessions WHERE name = ?";
  sqlite3_stmt *compiledStatement;

  //1. Prepare the sql statement
  int result = sqlite3_prepare_v2(dbHandle, sqlStatement, -1, &compiledStatement, NULL);

  if(result != SQLITE_OK) {
    NSLog(@"There's an error in the delete statement:\n%s", sqlite3_errmsg(dbHandle));
  }

  //2. Bind the method's parameter value to the sqlStatement's placeholder ?
  sqlite3_bind_text(compiledStatement, 1, itemName, -1, NULL);

  //3. Execute the prepared statement
  result = sqlite3_step(compiledStatement);

  if (result != SQLITE_DONE) {
    NSLog(@"The deletePossession method error:\n%s", sqlite3_errmsg(dbHandle));
  }

  //4. Finalize the prepared statement
  sqlite3_finalize(compiledStatement);
}
Step 2: Add code in the MasterViewController.m File
You need to add code shown below in the MasterViewController.m file’s commitEditingStyle: method.
- (void)tableView:(UITableView *)tableView commitEditingStyle:(UITableViewCellEditingStyle)editingStyle forRowAtIndexPath:(NSIndexPath *)indexPath
{
  if (editingStyle == UITableViewCellEditingStyleDelete) {
    //1. Delete a record from the database
    [self.appDelegate openDatabase];
    Item *selectedItem = self.itemsOwned[indexPath.row];
    [self.appDelegate deletePossession:selectedItem.itemName];
    [self.appDelegate closeDatabase];

    //2. Delete a row from the view's Table View control
    [self.itemsOwned removeObjectAtIndex:indexPath.row];
    [tableView deleteRowsAtIndexPaths:@[indexPath] withRowAnimation:UITableViewRowAnimationFade];
  } else if (editingStyle == UITableViewCellEditingStyleInsert) {
    // Create a new instance of the appropriate class, insert it into the array, and add a new row to the table view.
  }
}
Run The Application
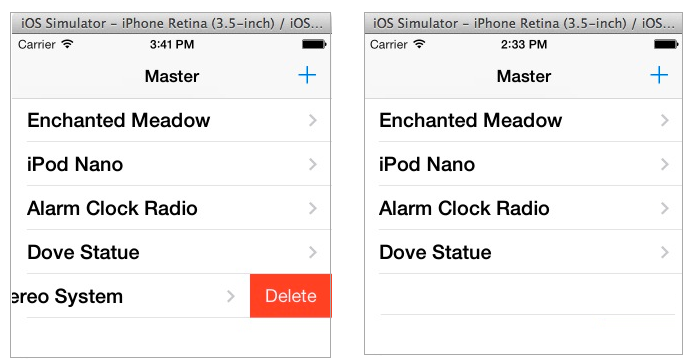
Run the application. Once you see the Master View screen in the simulator (first image below), swipe the last row to put the Table View in edit mode, then click the ‘Delete’ button. The system respond by executing code you placed in the commitEditingStyle: method, resulting in output shown in the second image below. The next time you run the application, the row (Mini Stereo System) will not appear in the Table View control. That’s because you added code in the commitEditingStyle: method to implement this operation: Delete a record from the database and the views Table View control.
By the way, the Table View control’s data source object (itemsOwned) contain four elements, which are instances of the Item class, as shown in the image below. The array the system deleted from the itemsOwned array is highlighted in blue.
That’s the end of this week’s workshop. In it, you learned how to delete rows from the database file and the Master View’s Table View control. Next week, you will learn about three types of JOIN queries the SQLite engine support.