
The main goal of this workshop is to show you how to persist the MasterViewController’s tableView data in a Property List file which resides in the application sandbox’s Documents directory. This mean you’ll have to add code in the AppDelegate class and the AddItemViewController class to make that happen.
The AppDelegate Code
Add this code in the AppDelegate.h file.
#import <UIKit/UIKit.h>

@interface AppDelegate : UIResponder <UIApplicationDelegate>

/*** PROPERTY VARIABLES ***/
@property (strong, nonatomic) UIWindow *window;
@property (strong, nonatomic) UINavigationController *navigationController;
@property (nonatomic, retain) NSString *dataFilePath;
@property (strong, nonatomic) NSMutableArray *tableDataSource;

/*** METHODS ***/
- (NSString *) getPathToDocumentsDir;
- (void)addShoppingListCategory:(NSString *)categoryName;
- (NSMutableArray *)fetchShoppingListCategories;
- (void)createPlistFile:(NSString *)fileName;

@end
You declared a property variable called dataFilePath for holding the full path to a plist file. You declared these methods in the AppDelegate file.
getPathToDocumentsDir
This method get the full path to the Documents directory and return it to the caller of the method. The Documents directory exist in the application sandbox. The sandbox is created the very first time you Build and run the ShoppingList project in Xcode.
addShoppingListCategory
This method add a category name in the shoppingListCategories.plist file. The method takes a single parameter, categoryName and returns nothing.
fetchShoppingListCategories
This method fetch all content from the shoppingListCategories.plist file and return it to the caller of this method. The method takes no parameter, but returns a NSMutableArray.
createPlistFile
This method create a plist file in the application sandbox’s Documents directory. It takes a single parameter, the name of the property list file the method will create in the Documents directory.
Switch to the AppDelegate.m file and this code, which implement methods you declared in the interface file.
#import "AppDelegate.h"
#import "MasterViewController.h"

@implementation AppDelegate

- (NSString *) getPathToDocumentsDir
{
  NSArray *paths = NSSearchPathForDirectoriesInDomains(NSDocumentDirectory, NSUserDomainMask, YES);
  NSString *documentsDir = [paths objectAtIndex:0];

  // Return the Documents directory
  return documentsDir;
}

- (void)addShoppingListCategories:(NSString *)categoryName
{
  // Get the full path to the shoppingListCategories.plist file
  self.dataFilePath = [self.getPathToDocumentsDir stringByAppendingPathComponent:@"shoppingListCategories.plist"];

  // Fetch all records from the plist file
  NSMutableArray *allRecords = [[NSMutableArray alloc] init];
  allRecords = [self fetchShoppingListCategories];

  // Add an object in the allRecords variable
  [allRecords addObject:categoryName];

  // Add the category names back in the plist file
  [allRecords writeToFile:self.dataFilePath atomically:YES];
}

- (NSMutableArray *)fetchShoppingListCategories
{
  // Get the full path to the shoppingListCategories.plist file
  self.dataFilePath = [self.getPathToDocumentsDir stringByAppendingPathComponent:@"shoppingListCategories.plist"];

  // Get all data from the plist file, assign it to a mutable variable
  NSMutableArray *fileContent = [[NSMutableArray alloc] initWithContentsOfFile:self.dataFilePath];

  // Return the plist file's data or an empty array
  return fileContent;
}

- (void)createPlistFile:(NSString *)fileName
{
  // Get full path to the plist file
  self.dataFilePath = [self.getPathToDocumentsDir stringByAppendingPathComponent:fileName];

  // The if statement check to see if the plist file DOESN'T exist in the Documents directory
  if (![[NSFileManager defaultManager] fileExistsAtPath:self.dataFilePath]) {
    // It doesn't so, create and initialize an empty array
    NSArray *rootArray = [[NSArray alloc] init];

    // This statement create the plist file in the Document directory and initialize it with the rootArray object
    [rootArray writeToFile:self.dataFilePath atomically:YES];
  }
}
Add this statement in the didFinishLaunchingWithOptions method which basically send a message to the createPlistFile method to create a property list file called, shoppingListCategories.plist in the application’s Documents directory.
- (BOOL)application:(UIApplication *)application didFinishLaunchingWithOptions:(NSDictionary *)launchOptions
{
  [self createPlistFile:@"shoppingListCategories.plist"];

  self.window = [[UIWindow alloc] initWithFrame:[[UIScreen mainScreen] bounds]];
  // Override point for customization after application launch.
  MasterViewController *masterViewController = [[MasterViewController alloc] initWithNibName:@"MasterViewController" bundle:nil];
  self.navigationController = [[UINavigationController alloc] initWithRootViewController:masterViewController];
  self.window.rootViewController = self.navigationController;
  [self.window makeKeyAndVisible];
  return YES;
}
Test The didFinishLaunchingWithOptions Method’s Code
You are ready to test the didFinishLaunchingWithOptions method’s code, but first I want you to do the follow so you can see the plist file created in the application sandbox’s Documents directory.
1. Use Finder to locate the ShoppingList sandbox in the Application directory. If you don’t remember how to do that, then consult this application sandbox post.
2. Once you’ve located the ShoppingList sandbox, drag and drop it in the trash can. Why? because we want to start with a fresh copy of the project.
3. Make sure you can see Xcode’s IDE and Finder on your monitor as shown in this snap shot.

Here are the steps to execute so you can see the ShoppingLit sandbox created in the Applications directory and the plist file created in the sandbox’s Documents directory.
1. Click Xcode’s Run button. As Xcode is building the application, keep your eye on Finder’s window. In a moment, the application sandbox will appear in the Applications directory. Once it does, click it to expand it. Finder should look like this now.

2. Click the Documents directory and you will see the shoppingListCategories.plist file listed there.
3. Double-click the file to open it in Xcode’s property list editor. As you can see, the plist file contain a single entry called Root which is of Type Array and it is empty.

This statement of the createPlistFile method is responsible for creating the Root array you see in the plist file.
[rootArray writeToFile:self.dataFilePath atomically:YES];
The shoppingList.plist file is created in the application’s Documents directory, so go ahead and delete the ShoppingList.plist file you see in the project navigator panel.
The MasterViewController Class Code
What you need to do now is add code in the MasterViewController class to perform these tasks.
- Change the tableDataSource property’s data type to an NSMutableArray
- Use the fetchShoppingListCategories method in the viewDidLoad method to fetch all data from the plist file and place them the tableDataSource object.
- Configure the view’s tableView control to display elements of the tableDataSource object.
Start by clicking the MasterViewController.h file and change the statement that declare the tableView’s dataSource object to this:
@property (strong, nonatomic) NSMutableArray *tableDataSource;
Switch to the MasterViewController.m file and import the AppDelegate class.
#import "AppDelegate"
Next, change the viewDidLoad method’s code to what’s shown below.
- (void)viewDidLoad
{
  [super viewDidLoad];
  self.navigationItem.leftBarButtonItem = self.editButtonItem;

  UIBarButtonItem *addButton = [[UIBarButtonItem alloc] initWithBarButtonSystemItem:UIBarButtonSystemItemAdd target:self action:@selector(addItem)];
  self.navigationItem.rightBarButtonItem = addButton;

  // Create an object of the AppDelegate so we can use its variables and methods
  AppDelegate *delegate = [[UIApplication sharedApplication] delegate];

  // Get data from the plist file and assign it to a mutable array
  self.tableDataSource = [delegate.self fetchShoppingListCategories];
}
Next, modify the tableView cellForRowAtIndexPath: method to what’s shown below.
// Customize the appearance of table view cells.
- (UITableViewCell *)tableView:(UITableView *)tableView cellForRowAtIndexPath:(NSIndexPath *)indexPath
{
  static NSString *CellIdentifier = @"Cell";

  UITableViewCell *cell = [tableView dequeueReusableCellWithIdentifier:CellIdentifier];
  if (cell == nil) {
    cell = [[UITableViewCell alloc] initWithStyle:UITableViewCellStyleDefault reuseIdentifier:CellIdentifier];
    cell.accessoryType = UITableViewCellAccessoryDisclosureIndicator;
  }

  // Configure the cell
  cell.textLabel.text = [self.tableDataSource objectAtIndex:indexPath.row];
  return cell;
}
If you were to run the application now, you’ll see an empty table, that’s because the tableDataSource object is current empty.
The AddItemViewController Class Code
The tableView control on the MasterViewController.xib file is all set up to display content pull from the shoppingList.plist file. What you need to do now, is add code in the AddItemViewController class to:
- modify the navigation bar’s title attribute to display the text: Add Category
- update the saveItem method’s code to save the category name the operator entered in the textField control to the plist.
Click the AddItemViewController.m file and code shown below, which modify the navigation bar’s title attribute.
- (id)initWithNibName:(NSString *)nibNameOrNil bundle:(NSBundle *)nibBundleOrNil
{
  self = [super initWithNibName:nibNameOrNil bundle:nibBundleOrNil];
  if (self) {
    self.title = @"Add Category";
  }
  return self;
}
Next, update the saveItem method’s code to what’s shown below.
- (void)saveItem {
  if (!self.masterViewController) {
    self.masterViewController = [[MasterViewController alloc] initWithNibName:@"MasterViewController" bundle:nil];
  }
  // Set the label control's textColor to green
  self.messageLable.textColor = [UIColor colorWithRed:0.00 green:0.50 blue:0.00 alpha:1.00];

  // Validate the textField control
  if ([self.categoryName.text length] == 0) {
    // Display an error message in the Label control
    self.messageLable.text = @"Please enter a Category Name.";
  } else {
    // Add the textField's data in the tableDataSource dictionary
    [self.categoryList addObject:self.categoryName.text];

    // Create an object of the AppDelegate so we can use its variables and methods
    AppDelegate *delegate = [[UIApplication sharedApplication] delegate];

    // Save category name the operator entered in the textField control in the plist file
    [delegate.self addShoppingListCategory:self.categoryName.text];

    // Display success message in the Label control
    self.messageLable.text = @"Item saved!";

    // Clear out the textField
    self.categoryName.text = nil;
    animated:YES];
  }
}
Test The AddItemViewController Class Code
It is time to test the AddItemViewController class code.
1. Use Finder to locate the ShoppingListCategories.plist file and double-click it to open it in the property list editor.

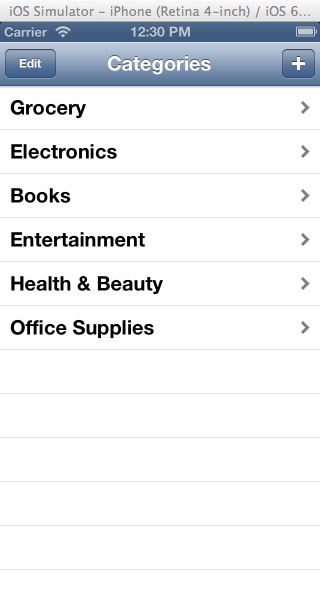
2. Now, launch the ShoppingList app in Xcode. The MasterViewController’s view is loaded in the iPhone Simulator window and it should look like this.

3. Click the navigation bar’s + button to load the AddItemViewController’s view in the Simulator. Use it to add these category names in tableDataSource array and the property list file.
| Category Names | The AddItemViewController view |
|---|---|
| Grocery
Electronics & Appliances Books Entertainment Health & Beauty Office Supplies |
 |
3. Now, click the navigation bar’s Categories button to return to the MasterViewController’s view. The tableView control should now look like this.
4. Take a look at the property list editor, it should look like this now.

Now to see if the tableView’s data is being persisted, terminate then relaunch the application. See, the category names appear again in the MasterView’Controller’s tableView control. By the way, if you were to modify, delete, or add an item in the plist file via the property list editor, it will be reflected in the MasterViewController’s tableView control, the next time you launch the ShoppingList application.
This conclude this week’s workshop on persisting the tableView control’s data. Until then, happy coding. 🙂