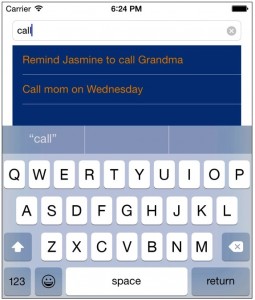
In an iOS application, autocomplete enables the app users to quickly complete a word, a web address that is only partially typed in a textField or a search box. In this workshop you learn how to implement the autocomplete feature in an iOS project.
Here is a QuickTime movie of that feature in action.
Now, download this Xcode project. When you finish unzipping the file, move the AutocompleteDemo folder to the Interactive Swift Programming folder.
Overview of The Project
Now, to implement the autocomplete feature in the project, you have to modify the storyboard scene and add code in the AddItemViewController.swift file. Before we do these tasks, let’s go over how the project work now.
| Code presented on this page assume you are using Xcode 6.4 and Swift version 1.2. So if you are using a newer version of Swift, it may produce errors. Fix them by using Xcode’s Fix-it tool. Also, I assume you aren’t a newbie to the Swift Programming Language and you know your way around Xcode Integrated Development Editor. |
When you launch the app for the first time, say on the iPhone 6 Simulator, it does the following:
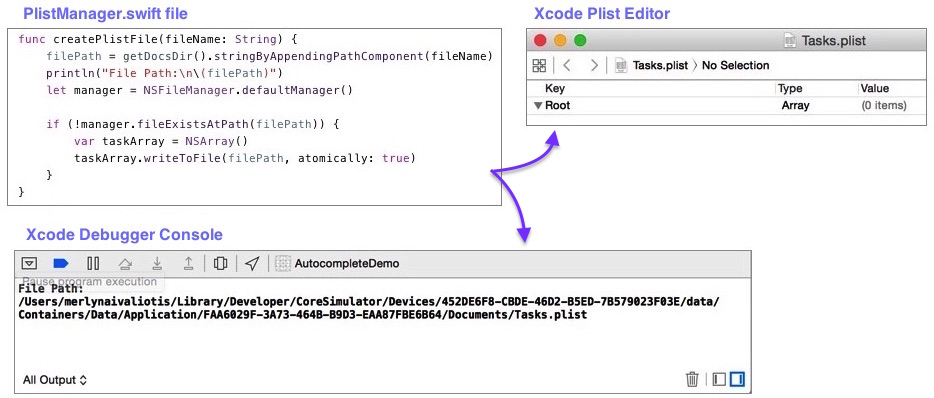
Create a plist file in the application sandbox’s Documents director and print the full path to the plist file in Xcode’s Debugger console. The code that perform these tasks is located in the PlistManager.swift file and you can view the plist file in Xcode’s Plist Editor.
Display the Add Item View on the simulator’s screen. The save button is connected to a function called save().
Code in the save() function perform these tasks:
- Validate the textField and display a message in the Label control.
- Call a user defined function that check to see if the task the user entered in the textField already exists in the taskList array.
- Call a user defined function that save the textField’s value in the taskList array.
- Save the taskList array in the plist file.
- Display error and success messages in the Label control.
Now, the helper class, PlistManager looks like this:
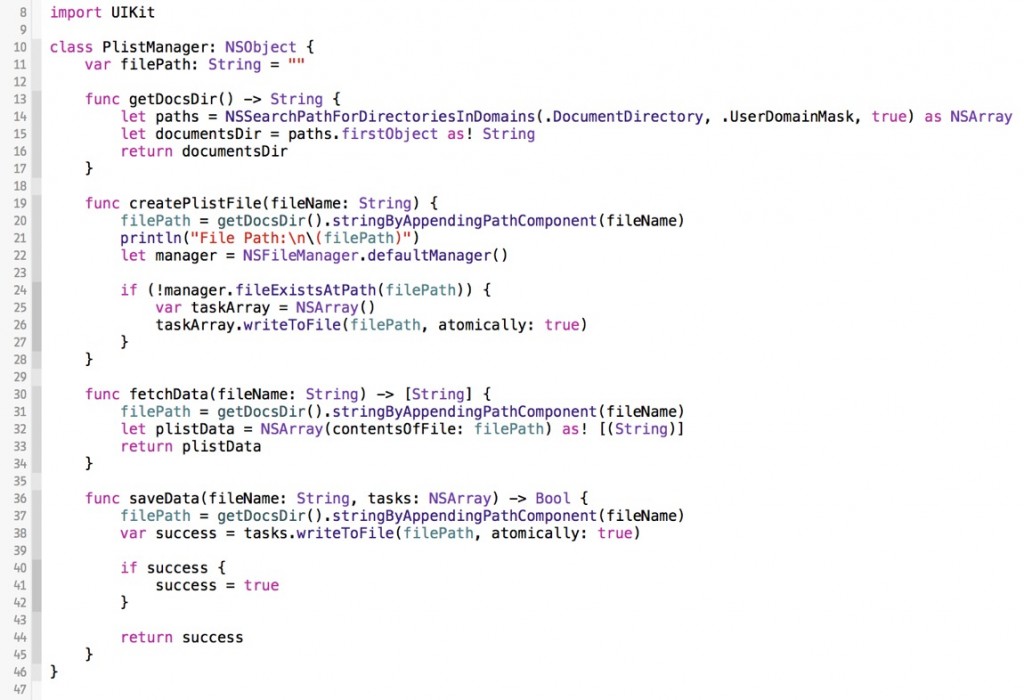 Here’s what each function does:
- getDocsDir() – This function fetch and return the full path of the sandbox’s Documents directory.
- createPlistFile() – This function create a plist file in the sandbox’s Documents directory.
- fetchData() – This function fetch the plist file’s NSArray, convert it to a swift Array and return it to its caller.
- saveData() – This function save an NSArray in the plist file and return the boolean value false or true.
Update The Storyboard Scene
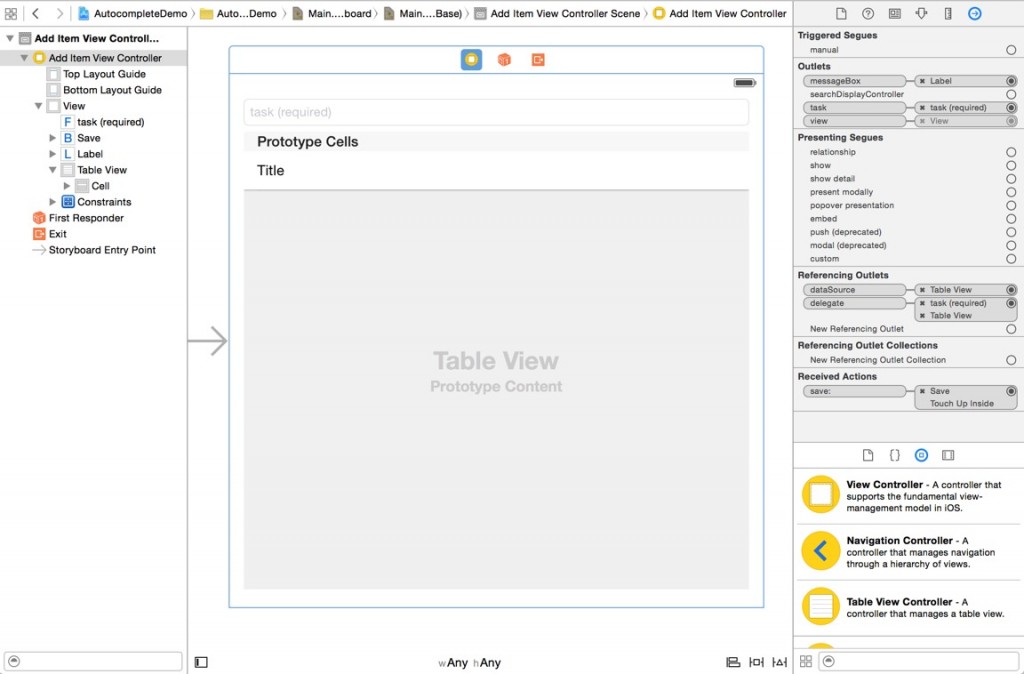
In order to implement the autocomplete feature in the AutocompleteDemo project, add a tableView control on the storyboard scene and configure it by doing the following:
- Add a cell on the tableView. You do that by setting the Prototype Cells attribute to 1.
- Select the Table View Cell and set its Identifier attribute to Cell and set the Style attribute to Basic.
- Connect the Table View’s dataSource and delegate outlets to the Add Item View Controller object.
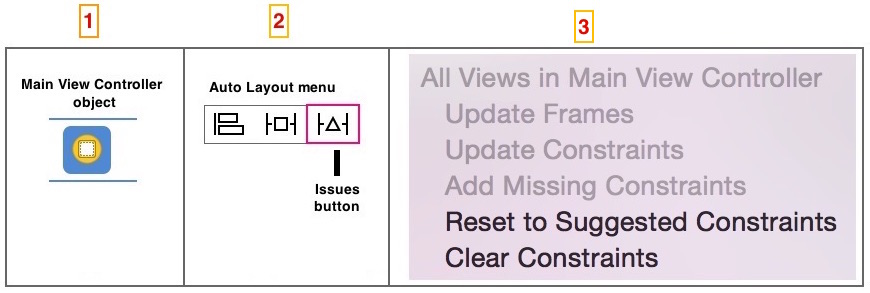
- Use the Issues button on the Auto layout bar to “Clear Constraints” then “Add Mission Constraints” to the Add Item View Controller object-see image below.
When you are done configuring the Table View, the Storyboard scene should look like this:
Update The AddItemViewController File
You have to code in the AddItemViewController.swift file to implement the autocomplete feature in the Add Item View. Start by declaring a property variable and a data source array for the Table View.
import UIKit

class AddItemViewController: UIViewController, UITextFieldDelegate {
  @IBOutlet weak var task: UITextField!
  @IBOutlet weak var messageBox: UILabel!
  @IBOutlet weak var autocompleteTableView: UITableView!
  var PLM = PlistManager()
  var taskList = [String]()
  var autocompleteWords = [String]()
  ...
}
In Interface Builder, connect the autocompleteTableView property to the Table View.
What you have to do now is add code in the AddItemViewController.swift file to hide the autocompleteTableView and set its background color.
override func viewDidLoad() {
  super.viewDidLoad()
  PLM.createPlistFile("Tasks.plist")
  taskList = PLM.fetchData("Tasks.plist")
  autocompleteTableView.hidden = true
  autocompleteTableView.backgroundColor = UIColor(red: 0.00, green: 0.25, blue: 0.50, alpha: 1.00)
}
The next thing you have to is add code in the AddItemViewController.swift file to dismiss the keyboard and hide the autocompleteTableView, when the user touch the view’s background.
override func touchesBegan(touches: Set<NSObject>, withEvent event: UIEvent) {
  task.resignFirstResponder()
  autocompleteTableView.hidden = true
}
Now, you have to add code in the AddItemViewController.swift file to perform these tasks:
- Count and return the number of rows there are in the autocompleteTableView’s section.
- Populate the autocompleteTableView cells with tasks stored in the autocompleteWords array.
- Set the autocompleteTableView cell’s background color.
- Set the autocompleteTableView cell’s text color.
Here’s the code to implement above tasks in the AddItemViewController.swift file.
// MARK: - Table View data source and delegate functions
func tableView(tableView: UITableView, numberOfRowsInSection section: Int) -> Int {
    return autocompleteWords.count
}

func tableView(tableView: UITableView, cellForRowAtIndexPath indexPath: NSIndexPath) -> UITableViewCell {
    var cell = tableView.dequeueReusableCellWithIdentifier("Cell", forIndexPath: indexPath) as! UITableViewCell
    cell.backgroundColor = UIColor(red: 0.00, green: 0.25, blue: 0.50, alpha: 1.00)
    cell.textLabel!.textColor = UIColor.orangeColor()
    cell.textLabel!.text = autocompleteWords[indexPath.row]
    return cell
}
The next thing you have to do is add code in the AddItemViewController.swift file to perform these tasks, when the user select a task from the autocompleteTableView:
- Add the selected task in the textField.
- Dismiss the keyboard.
- Hide the autocompleteTableView.
Here’s the code to implement above tasks in the AddItemViewController.swift file.
func tableView(tableView: UITableView, didSelectRowAtIndexPath indexPath: NSIndexPath) {
    let selectedCell: UITableViewCell = tableView.cellForRowAtIndexPath(indexPath)!
    task.text = selectedCell.textLabel!.text
    task.resignFirstResponder()
    autocompleteTableView.hidden = true
}
The last thing you have do is add code in the AddItemViewController.swift to perform these tasks, when the user type text in the textField:
- Clear out the autocompleteTableView’s data source and the Label control.
- Search for the keyword that matches an element in the taskList array.
- Dump the search results (tasks) in an array constant called searchResults.
- Check to see if the search query returned zero result; if so, hide the autocompleteTableView.
- Check to see if the search query returned one or more results; if so, loop through the searchResults array and dump its elements in the autocompleteTableView’s data source array, show the autocompleteTableView, and refresh it so search results appear in its cells.
Here’s the code to implement above tasks in the AddItemViewController.swift file.
func textField(textField: UITextField, shouldChangeCharactersInRange range: NSRange, replacementString string: String) -> Bool {
    autocompleteWords.removeAll(keepCapacity: false)
    messageBox.text = nil
    let predicate : NSPredicate = NSPredicate(format: "SELF contains[c] %@", textField.text)
    let searchResults = taskList.filter {predicate.evaluateWithObject($0)}

    if searchResults.count == 0 {
        autocompleteTableView.hidden = true
    } else {
        for task in searchResults {
            autocompleteWords.append(task)
        }

        autocompleteTableView.hidden = false
        autocompleteTableView.reloadData()
    }

    return true
}
That’s all the code you have to add in the AddItemViewController.swift file; so run the app in the iPhone or iPad Simulator and test the autocomplete feature. The autocomplete feature should function just like the one shown in the QuickTime movie presented at the beginning of this document.
That’s it! Comments are welcomed. 🙂

