
The main goal of this workshop is to show you two ways to add rows in the tableView control. You will also learn two ways to dismiss the keyword.
Two Ways to Add Rows in The TableView
Adding rows in a tableView is pretty much boils down to adding data in the tableView’s dataSource object and there are two ways to do it, via the viewDidLoad method or a via a view. Remember, the dataSource can be any Objective-C object (NSDictionary or NSArray), as long as it conforms to the UITableViewDataSource protocol.
Method 1: Add data in the DataSource via the viewDidLoad method
If you want to preload the tableView rows with data before the view containing the tableView control is loaded in the device’s window, you’ll have to add code in your viewController’s viewDidLoad method.
I want you to launch the ShoppingList project in Xcode, then execute these steps to add some rows in the tableView control that’s on the MasterViewController’s canvas.
1. Click the MasterViewController.m file to load it in Interface Builder, then add code shown below.
- (void)viewDidLoad
{
  [super viewDidLoad];
  // Do any additional setup after loading the view, typically from a nib.
  self.navigationItem.leftBarButtonItem = self.editButtonItem;

  UIBarButtonItem *addButton = [[UIBarButtonItem alloc] initWithBarButtonSystemItem:UIBarButtonSystemItemAdd target:self action:@selector(addItem)];
  self.navigationItem.rightBarButtonItem = addButton;

  self.tableDataSource = [NSMutableArray arrayWithObjects:@"Grocery",
			@"Health & Beauty",
			@"Electronics & Appliances",
			@"Other",
                        @"Office Supplies",
                        nil];
}
// Customize the appearance of table view cells.
- (UITableViewCell *)tableView:(UITableView *)tableView cellForRowAtIndexPath:(NSIndexPath *)indexPath
{
  static NSString *CellIdentifier = @"Cell";

UITableViewCell *cell = [tableView dequeueReusableCellWithIdentifier:CellIdentifier];
  if (cell == nil) {
    cell = [[UITableViewCell alloc] initWithStyle:UITableViewCellStyleDefault reuseIdentifier:CellIdentifier];
    cell.accessoryType = UITableViewCellAccessoryDisclosureIndicator;
   }

  // Configure the cell
  NSArray *sortedDicValues = [self.tableDataSource sortedArrayUsingSelector:@selector(compare:)];
  cell.textLabel.text = [sortedDicValues objectAtIndex:indexPath.row];
  return cell;
}
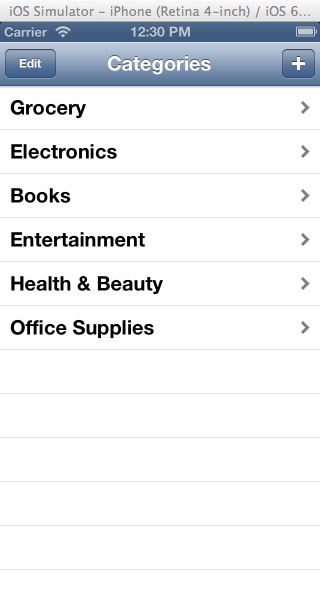
2. Run the application. As you can see, objects you added in the tableDataSource array appear in the tableView control’s rows.

Method 2: Add data in the dataSource via a view
If you want the app user to provide data for the tableView’s dataSource, you’ll have to present the user a view. The app user will use it to add information for an item. You’ll have to add code in the view’s class to save information the user entered in the view’s controls, into the tableView’s dataSource object.
I want you to execute these steps to enable the user to add objects in the tableDataSource array, which will show up in the MasterViewController’s tableView.
1. Click the AddItemViewController.m file and add code shown below.
- (void)saveItem
{
  if (!self.masterViewController) {
    self.masterViewController = [[MasterViewController alloc] initWithNibName:@"MasterViewController" bundle:nil];
  }

  // Validate the textField control
  if ([self.categoryName.text length] == 0) {
    // Display an error message in the Label control
    self.messageLable.text = @"Please enter a Category Name.";
  } else {
    // Save the textField's content in the tableDataSource dictionary
    [self.categoryList addObject:self.categoryName.text];
    [self.masterViewController.tableDataSource addObject:self.categoryList];

    // Display success message in the Label control
    self.messageLable.text = @"Item saved!";

    // Clear out the textField
    self.categoryName.text = nil;
  }
}
2. Run the application and use the AddItemViewController view to add these categories:
Outdoor, Camping, Books
3. After entering the last item in the textField control, click the navigation bar’s Categories button to return to MasterView.
 |
 |
 |
As you can see, categories you entered in the AddItemViewController’s textField control appear in the tableView control along with those you hard-coded in the viewDidLoad method, earlier on. Also notice the success/failure message that’s displayed below the textField control when you click the navigation bar’s Save button.
Two Ways to Dismiss The Keyboard
When the app user tap a control such a textField, the keyboard appear. It doesn’t disappear when the operator tap the view’s background or the keyboard’s return key. There are two ways the user can dismiss the keyboard:
- Taping the view’s background
- Tapping the keyboard’s return key
The UITextFieldDelegate protocol have three methods you can implement in the MasterViewController.m file to dismiss the keyboard and they are as follows:
touchesBegan:
This method is fired when the operator tap the view’s background. Code you write in the method dismiss the keyboard.
textFieldShouldReturn
This method is fired when the user tap the keyboard’s return key. Code you write in the method dismiss the keyboard.
Further more, you’ll have to conform the MasterViewController class to the UITextField protocol; otherwise, above mentioned methods won’t fire.
1. Alrighty then, I want you to conform the AddItemViewController class to the UITextFieldDelegate protocol like this:
@interface AddItemViewController : UIViewController <UITextFieldDelegate>
2. Add this method in the AddItemViewController.m file.
// This method is fired when the user tap the view's background; thus dismissing the keyboard
- (void)touchesBegan:(NSSet *)touches withEvent:(UIEvent *)event
{
  [self.view endEditing:YES];
}
3. Now, run the app and test the method’s code by clicking inside the textField control to make the keyboard appear. Next, click the view’s background. Voila! the keyboard disappear.
4. Terminate the app then add this code in the file.
// This method is fired when the user tap the keyboard's return key; thus dismissing the keyboard
-(BOOL)textFieldShouldReturn:(UITextField *)textField
{
  [textField resignFirstResponder];
  return YES;
}
5. Go ahead and test the method by running the app again. click inside the textField to make the keyboard appear. Now, tap the keyboard’s return key. As you can see, it disappear.