
If you are a new visitor to our site, please read the Getting Started guide.
This is a seven part series on how to use the tableView control in an iOS application called ShoppingList. This table outline what’s covered in each workshop.
Workshop 1: Adding RowsThe main goal of this workshop is to show you two ways to add rows in the tableView control. You will also learn two ways to dismiss the keyword. |
Workshop 5: Deleting a rowThe main goal of this workshop is to show you how to implement the row deletion event performed by the app user. |
Workshop 2: Persisting The tableView DataThe main goal of this workshop is to show you how to persist the MasterViewController’s tableView data in a Property List file which resides in the application sandbox’s Documents directory. |
Workshop 6: Grouping rowsThe main goal of this workshop is to show you how to present the tableView’s rows in one or more groups. |
Workshop 3: Selecting a rowThe main goal of this workshop is to show you how to implement the row selection event performed by the app user. |
Workshop 7: Searching the tableThe main goal of this workshop is to show you how to implement the search event performed by the app user. |
Workshop 4: Reordering a rowThe main goal of this workshop is to show you how to implement the row ordering event performed by the app user. |
Before You Begin
Let me debrief you on the tableView control and the ShoppingList application you will develop in this series.
The tableView Control
The tableView control is nothing more than a container for displaying rows of data in a single column. The user can scroll it vertically to view its rows. Here’s one thing you should never, ever forget about the tableView control.

The tableView control comes in two styles: Plain and Group and they look like this in Interface Builder. As you can see, the tableView’s rows are zero index. The tableView’s Section Header and Section Footer are zero index as well.

In order for the tableView to work you’ll have to implement (add) these methods of the tableView control in your viewController class.
| DataSource Methods | Delegate Method |
|---|---|
| numberOfSectionsInTableView Code you add in this method tells the tableView control how many sections it will display. |
didSelectRowAtIndexPath Code you add in this method tells the tableView control to load another view in the device’s window; for example, tableView or a detailView. |
| numberOfRowsInSection Code you add in this method tells the tableView know how many rows it should display a section. |
|
| cellForRowAtIndexPath Code you add in this method is for displaying data in its rows. |
There are other methods you can implement in your viewController class. For example, if you set the tableView control’s Style attribute to Grouped and you want to display Section headers, you’ll have to implement the titleForHeaderInSection method in your viewController class.
The tableView Control needs four components for it to work in your iOS application.
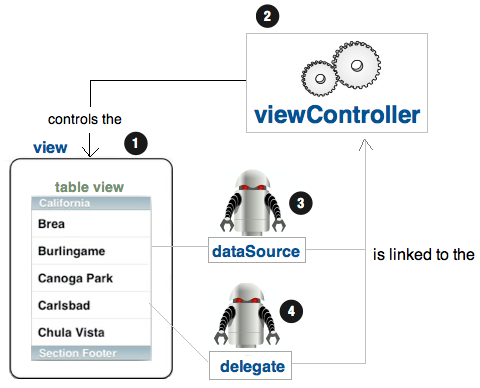
Diagram (a): Components of the tableView control
1. viewController
The viewController is an instance of the UIViewController class and it controls the view; in other words it is the boss of the view.
2. view
The view is an instance of the UIView class and as you can see in diagram (a) above, it serves as a container for the tableView control and its cells.
3. dataSource
The dataSource job is to provide the tableView control these data so it can construct itself.
- the number of sections
- the number of rows a section contain
- the data to be shown in a section’s rows
Without a dataSource, a tableView control is just an empty container. By the way, the dataSource can be any Objective-C object (NSDictionary or NSArray), as long as it conforms to the UITableViewDataSource protocol.
A protocol defines a list of required and optional methods that a class implement. If a class adopts a protocol, it must implement all required methods of the protocol it adopts. For example; a class called SomeClass, adopts one or more protocols of another class, say ClassB by enclosing ClassB’s protocol names in angle brackets as shown in this syntax:
@interface SomeClass : NSObject <ClassBDataSource, ClassBDelegate> |
4. delegate
Its job is to respond to user actions, such as these:
- tapping a row of the tableView control
- addind a row in the tableView control
- Deleting a row from the tableView control
- Reorder a row of the tableView control
- Searching the tableView control rows for an item
The delegate can be any object; for example, an instance of the UIViewController class. The delegate object must conform to the UITableViewDelegate protocol. This protocol has many methods you can implement in the delegate’s implementation file. One of them is the tableView: didselectRowAtIndexPath: method. It is fired when the user tap a cell of the tableView control. You’ll have to add code in this method to: populate controls placed on another view’s canvas with data stored in the tableView’s dataSource object (for example, an NSArray object).
How Components of The Table View Control Work
How components of the tableView control work behind the scene to populate its cells with data is shown in diagram (a) below. How the user interacts with the tableView is shown in diagram (b).
 Diagram (a): populate the tableView cells |
 Diagram (b): user interaction with the tableView |
The ShoppingList Application
In order to to learn how to use the tableView control, you’ll develop a ShoppingList application. It will have three nib files and corresponding class files, an AppDelegate class, and a plist file. The nib files are the applications views. The plist file is for persisting the tableView data. The class files as you already know, is where you write code to make the app’s views functional. As for the AppDelegate class, you add code in it to setup the application’s data model.
I want you to download the ShoppingList application you’ll develop in this series. Once you’ve unzip the file, drop the ShoppingList folder in this directory: /Users/yourname/Documents/iOS Apps

By the way, I used the Master-Detail Application to create the ShoppingList project. I used Xcode’s Property List template to create the ShoppingList.plist file. I tweaked the nib files and class files’ codes to give the app some basic functionality.
That’s all for this week. Next week, you will begin your journey on learning how to use the tableView control. Until then, happy coding! 🙂