
The main goal of this workshop is to show you how to implement the search event performed by the app user. Scrolling through a large set of table rows can be frustrating to the user of the tableView control. Wouldn’t it be nice if we could present the user with a search box so she can search the tableView control for an item by its name, then present the search results in the tableView rows?
Well, to implement the search a feature in the ShoppingList application you’ll have to add a new class and file in the project by doing the following. You’ll have to add a search bar in the view as well.
Add a Class and View in The Project
Launch the ShoppingList follow instruction shown in these images to add a class and view in the project. In the third screen, enter SearchViewController in the Class box and select UITableViewController for the Subclass of menu before clicking the Next button.
 |
 |
|
 |
 |
Once Xcode have added the SearchViewController class and view files in the project navigation panel move them in the ShoppingList folder as shown in this snap shot.

Add a Search Bar
Click the SearchViewController.xib file to load it in Interface Builder and follow instructions shown in this image to add a Search Bar above the tableView control.
 |
Load The Search View
What you need to do now is is change the didFinishLaunchingWithOptions method’s code to load the SearchView instead of the MasterView.
First, import the SearchViewController interface file by adding this statement in the AppDelegate.m file.
#import "SearchViewController.h"
Next, modify the didFinishLaunchingWithOptions method’s code to load the SearchView in the device’s window instead of the MasterView.
- (BOOL)application:(UIApplication *)application didFinishLaunchingWithOptions:(NSDictionary *)launchOptions
{
  // Create two plist files in the app's Documents directory
  [self createPlistFile:@"shoppingListCategories.plist"];
  [self createPlistFile:@"shoppingListItems.plist"];

  self.window = [[UIWindow alloc] initWithFrame:[[UIScreen mainScreen] bounds]];
  // Override point for customization after application launch.
  SearchViewController *searchViewController = [[SearchViewController alloc] initWithNibName:@"SearchViewController" bundle:nil];
  self.navigationController = [[UINavigationController alloc] initWithRootViewController:searchViewController];
  self.window.rootViewController = self.navigationController;
  [self.window makeKeyAndVisible];
  return YES;
}
Once you’ve completed above steps, run the application and the SearchView will look like this:

Components of The TableViewController
Now that you’ve set up the SearchView’s user interface, you are ready to add code in the SearchViewController class to make its view functional. Before you start adding code in the class files, let’s go over components of the TableViewController the Objective-C template set up for you in the SearchViewController class and view.
Load the SearchViewController.xib file in IB, click the File’s Owner object to, then click the Connections Inspector icon to show it in the Utilities panel. Now, take a look at the connections the template made for the tableView control that’s on the view’s canvas.

As you can see, the template connected three components of the tableViewController for you: the tableView control, its dataSource and delegate. This diagram shows how components of the tableViewController work from the user’s perspective.
By default, TableViewController’s main view is a tableView. Further more, the TableViewController serves as both the delegate and data source for the view. What this means is, it is responsible for populating the tableView with dataSource object, configuring how the data is displayed in the tableView, and determining what to do when the user interacts with the tableView (scroll its rows, select a row, delete a row, and so forth). The Objective-C template implemented (added) the tableView control’s dataSource and delegate methods in the SearchViewController.m file for you. All you have to do is modify their code to make the tableView control a useful user interface object. By the way, the Objective-C template did not implement the searchBar’s delegate methods in the SearchViewController.m file, you’ll have to do it yourself.
Connect The SearchBar Properties
You’ve added the searchBar control above the tableView control. Now, you’ll have to connect it to an IBOutlet property, which you’ll declare in the SearchViewController.h file. You’ll have to connect the searchBar control’s delegate property as well. Start by adding these statements in the SearchViewController.h file.
#import <UIKit/UIKit.h>

@interface SearchViewController : UITableViewController

@property (strong, nonatomic) NSMutableArray *tableDataSource;
@property (strong, nonatomic) IBOutlet UISearchBar *searchBar;
@property (strong, nonatomic) NSMutableArray *searchResults;
@property (readwrite, nonatomic) BOOL isSearchOn;
@property (readwrite, nonatomic) BOOL canSelectRow;

@end
 What you did?
The first statement declares a property for storing the tableView control’s data. The second statement declares an IBOutlet property for the searchBar control. The third statement is for storing search result, which are displayed in the tableView control. The last two statements declare boolean variables. You’ll use them in the search bar’s delegate methods.
I want you to click the SearchViewController.xib to load it in IB. Use the Connections Inspector window to connect the searchBar outlet property to the File’s Owner object. Connect the delegate outlet property to the File’s Owner as well. When you are done, the Connections Inspector window should look like this:

Why did you connect the Search Bar to the delegate outlet property? The answer to this question is in this tip. Please remember to do what it say; thus saving yourself hours of frustration.

How The Search Bar Work
You are ready to implement the searchBar control’s delegate methods in the SearchViewController.m file; but first, heres’s how the search bar work from the user’s perspective.

The Search Bar Code
Ok, you know how the search bar work from the user’s perspective, you are ready to add code in the SearchViewController.m file. You will add code to populate the tableView control, and make the search bar work. Start by adding this code in the viewDidLoad method.
- (void)viewDidLoad
{
  [super viewDidLoad];
  // Set the navigation bar's title property
  self.title = @"Item List";

  // Initialize the searchResults array with an empty mutable array
  self.searchResults = [[NSMutableArray alloc] init];

  // Initialize the boolean variables
  self.isSearchOn = NO;
  self.canSelectRow = YES;

  // Set the search bar's placeholder attribute
  self.searchBar.placeholder = @"Type something here";

  // Create an object of the AppDelegate so we can use its variables and methods
  AppDelegate *delegate = [[UIApplication sharedApplication] delegate];

  self.listOfItems = [[NSMutableArray alloc] init];

  // Get data from the plist file and assign it to a dictionary object
  self.tableDataSource = [delegate.self fetchShoppingListItems];

  for (NSArray *columns in [self.tableDataSource allValues]) {
    for (NSArray *rows in columns) {
      [self.listOfItems addObject:rows];
    }
  }
  NSLog(@"%@",self.listOfItems);
}
Dissecting the For Loops Code
Code you entered in the viewDidLoad method is pretty straight forward, except for the nested for loops. In essence, they get all item names from the tableDataSource dictionary and place them in the listOfItems property variable. To understand how they work, you’ll have to visualize the tableDataSource dictionary as a table, consisting of columns and rows. The outer for loop process the dictionary columns which are arrays. The inner for loop process the dictionary rows and they are arrays as well.

This diagram shows how the for loops assign data to the listOfItems array.

Moving along, I want you to add code shown below in the tableView control’s dataSource methods.
#pragma mark - Table view data source

- (NSInteger)numberOfSectionsInTableView:(UITableView *)tableView
{
  return 1;
}

- (NSInteger)tableView:(UITableView *)tableView numberOfRowsInSection:(NSInteger)section
{
  if (self.isSearchOn) {
    return self.searchResults.count;
  } else {
    return self.listOfItems.count;
  }
}

- (UITableViewCell *)tableView:(UITableView *)tableView cellForRowAtIndexPath:(NSIndexPath *)indexPath
{
  static NSString *CellIdentifier = @"Cell";
  UITableViewCell *cell = [tableView dequeueReusableCellWithIdentifier:CellIdentifier];
  if (cell == nil) {
    cell = [[UITableViewCell alloc] initWithStyle:UITableViewCellStyleDefault reuseIdentifier:CellIdentifier];
  }
  // Configure the table cell
  if (self.isSearchOn) {
    // Search is on,
    cell.textLabel.text = [self.searchResults objectAtIndex:indexPath.row];
  } else {
    // Search is not on
    cell.textLabel.text = [self.listOfItems objectAtIndex:indexPath.row];
  }
  return cell;
}
Here is the final piece of code to add in the SearchViewConroller.m file. Add them above the @end keyword.
// This method is fired when the user tap the navigation bar's Done button
- (void) doneSearching:(id)sender
{
  self.isSearchOn = NO;
  self.canSelectRow = YES;
  self.tableView.scrollEnabled = YES;

  // Hide the navigation bar's Done button
  self.navigationItem.rightBarButtonItem = nil;

  // These statements hide the keyboard, empty the search box, then reload the table
  [self.searchBar resignFirstResponder];
  self.searchBar.text = nil;
  [self.tableView reloadData];
}

#pragma mark - Search Bar delegate methods
// This method is fired when the user tap the Search Bar control's text field
- (void) searchBarTextDidBeginEditing:(UISearchBar *)searchBar
{
  self.isSearchOn = YES;

  if (searchBar.text.length > 0){
    self.canSelectRow = YES;
    self.tableView.scrollEnabled = YES;
  } else {
    self.canSelectRow = NO;
    self.tableView.scrollEnabled = YES;
  }

  // Create and display a UIBarButtonItem (Done) on the view's navigation bar
  self.navigationItem.rightBarButtonItem = [[UIBarButtonItem alloc] initWithBarButtonSystemItem:UIBarButtonSystemItemDone target:self action:@selector(doneSearching:)];
}

// This method is fired when the user type something in the Search Bar's text field
-(void)searchBar:(UISearchBar *)searchBar textDidChange:(NSString *)searchText
{
  [self.searchResults removeAllObjects];

  if (searchText.length > 0) {
    // The user is searching for an item
    self.canSelectRow = YES;
    self.tableView.scrollEnabled = YES;

    for (NSArray *item in self.tableDataSource) {
      NSString *itemName = [item objectAtIndex: 0];
      // Theses statements check to see if the search string exist in the listOfItems array,
      // if it does, then matching results are added in the searchResults array
      NSRange inRange = [itemName rangeOfString:searchText options:NSCaseInsensitiveSearch];
      if (inRange.length > 0) [self.searchResults addObject:item];
    }
  } else {
    // The user is not searching for an item
    self.canSelectRow = NO;
    self.tableView.scrollEnabled = NO;
  }
  [self.tableView reloadData];
}
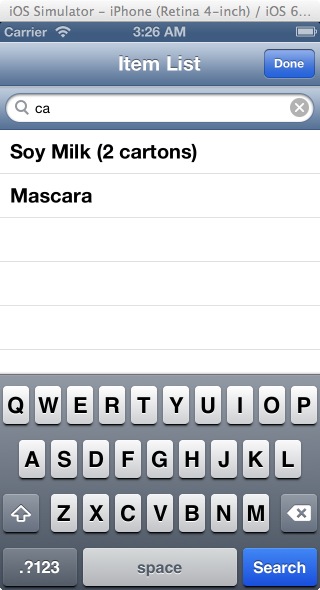
Test The Class Code
Now is a good time to run the application to test code you’ve entered in the SearchViewController.m file. The first image shows what the view look likes when it is loaded in the device window. The second image shows what the view look like when you click in the search bar’s text field. As you can see, the Done button appear in the navigation bar. Click it, any text you entered in the search bar is discarded, the keyboard and Done button disappear. The view will look like the first image again. By the way rows shown in the first image comes from the listOfItems array. Rows shown in the second image comes from the searchResults array.
 |
 |
This concludes this weeks’s workshop! Until then happy coding.