The main goal of this workshop is to show you how to present the tableView’s rows in one or more groups.
Say we want to group the MasterViewController’s rows; well, would have to first change the tableView’s Style attribute in Interface Builder from Plain to group then modify code in a few methods of the tableView control.
Here is the first method to modify. The statement will return the number 6, because there are 6 Keys (Categories) in the plist file.
#pragma mark - Table View

- (NSInteger)numberOfSectionsInTableView:(UITableView *)tableView
{
  return self.tableDataSource.count;
}
Add code shown below in the numberOfRowsInSection and the titleForHeaderInSection method.
- (NSInteger)tableView:(UITableView *)tableView numberOfRowsInSection:(NSInteger)section
{
	// Create an object of the AppDelegate so we can use its variables and methods
	AppDelegate *delegate = [[UIApplication sharedApplication] delegate];

	// Get data from the plist file and assign it to a mutable array
	NSDictionary *itemList = [delegate.self fetchShoppingListItems];

	// Place a section key (for example, Books) in a variable
	NSString *sectionKey = [self.tableDataSource objectAtIndex:section];

	// Place the section's item names (Going Home, One for The Money) in an array
	NSArray *sectionNames = [itemList objectForKey:sectionKey];

	return [sectionNames count];
	//return self.tableDataSource.count;
}

// This method display section headers
- (NSString *)tableView:(UITableView *)tableView titleForHeaderInSection:(NSInteger)section {
	// Display section headers
	NSString *groupHeadings = [self.tableDataSource objectAtIndex:section];
	return groupHeadings;
}
Finally, add code shown below in the method.
- (UITableViewCell *)tableView:(UITableView *)tableView cellForRowAtIndexPath:(NSIndexPath *)indexPath
{
	static NSString *CellIdentifier = @"Cell";

	UITableViewCell *cell = [tableView dequeueReusableCellWithIdentifier:CellIdentifier];
	if (cell == nil) {
	  cell = [[UITableViewCell alloc] initWithStyle:UITableViewCellStyleSubtitle reuseIdentifier:CellIdentifier];
	  cell.accessoryType = UITableViewCellAccessoryDisclosureIndicator;
	}

	// Create an object of the AppDelegate so we can use its variables and methods
        AppDelegate *delegate = [[UIApplication sharedApplication] delegate];

	// Get an element of the tableDataSource array and place it in the sectionName object; for example, Books
	NSString *sectionName = [self.tableDataSource objectAtIndex:[indexPath section]];

	// Get items belonging to that sectionName, place them in the array
	NSDictionary *dicItems = [delegate.self fetchShoppingListItems];
	NSArray *itemNames = [dicItems objectForKey:sectionName];

	// Display the itemNames in six groups
	cell.textLabel.text = [itemNames objectAtIndex:indexPath.row];
	return cell;
}
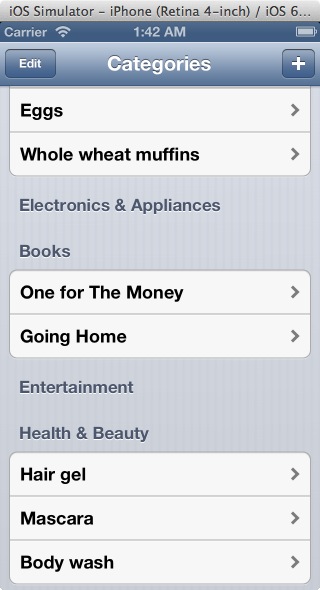
When you are done, run the application. The MasterViewController’s tableView will now look the snap shot shown below. Since there are no items for two categories (Electronics & Appliances, Entertainment) no group were created for them.