
The main goal of this workshop is to show you how to implement the row deletion event performed by the app user.
When the user is presented with a list of items in the DetailViewController.xib file, she can put the view’s tableView control in edit mode by simply tapping the navigation bar’s Edit button or swiping a row. The app respond by putting editing controls in the tableView rows as shown in Figure 1 and Figure 2.
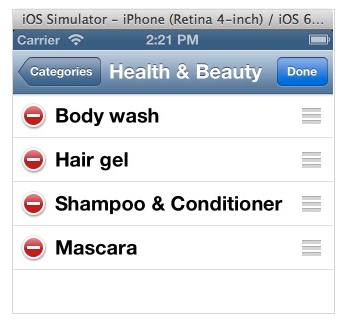 Figure 1: The tableView in edit mode when the user tap the Edit button |
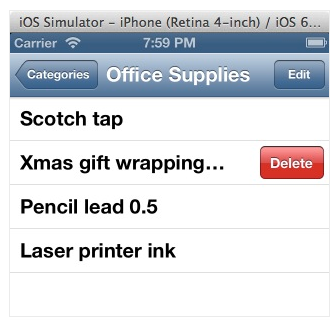 Figure 2: tableView in edit mode when the user swipe a row |
Control you see in the tableView control’s rows are annotated in this table.
| Control | Name | Description |
|---|---|---|
| Delete button control | In edit mode, this control reveals and hides the row’s Delete button. | |
| Delete button | In edit mode, this button deletes the row. | |
| Row reorder control | In edit mode, this control is for relocating a row by dragging it to another row in the table. |
Now, to implement the deletion of the table rows that’s on the DetailViewController’s view, you’ll have to add this method in the DetailViewController.m file. It is fired when the operator swipe the table row.
// This method is fired when the user swipe the table row
- (void)tableView:(UITableView *)tableView commitEditingStyle:(UITableViewCellEditingStyle)editingStyle forRowAtIndexPath:(NSIndexPath *)indexPath
{
  if (editingStyle == UITableViewCellEditingStyleDelete) {
    //1. Remove an object (Xmas wrapping paper) from the itemList array
    [self.itemList removeObjectAtIndex:indexPath.row];

    //2. Make the tableDataSource object a mutable dictionary so we can delete an entry from it
    NSMutableDictionary *dicObjects = [self.tableDataSource mutableCopy];

    //4. Delete the old version of the itemList from the tableDataSource object
    [dicObjects removeObjectForKey:self.selectedCategory];

    //3. Put the updated version of the itemList in as new entry in the mutable dictionary
    [dicObjects setObject:self.itemList forKey:self.selectedCategory];

    //5. Save changes made to the dicObjects in the plist file
    AppDelegate *delegate = [[UIApplication sharedApplication] delegate];
    [delegate.self addShoppingListItems:dicObjects];

    //6. We are done, so refresh the table
    [tableView deleteRowsAtIndexPaths:@[indexPath] withRowAnimation:UITableViewRowAnimationFade];
  }
}
Run the app, access the DetailViewController’s view by clicking the MasterViewController’s table row. Now, click-drag your mouse left or right to in the table row; thus mimicking the row swiping action. The Delete button appears in the row as shown in Figure 1 above. Click the button and the row is deleted from the table and the shoppingList.plist file. To verify that the item was deleted from the plist file, simply shut down the application then run it again. As you can see the item no longer appear in the table.
I’ve done my best to document the commitEditingStyle method’s code but, you may still have difficulty understanding it, so here’s a visual of how the code work.
