
The main goal of this workshop is to show you how to implement the row ordering event performed by the app user.
How The User Rearrange The tableView Row
When the user is presented with a list of items in the DetailViewController.xib file, she can put the view’s tableView control in edit mode by simply taping the navigation bar’s Edit button. The app respond by putting editing controls in the tableView rows as shown in Figure 1. Controls you see on the right side of the table rows are reordering controls. Those on the left are delete controls.
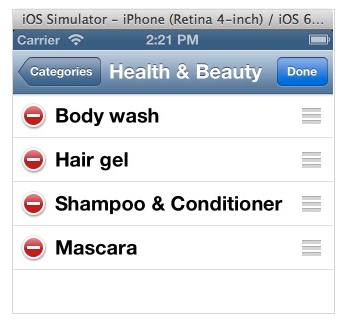
Figure 1: The tableView control in edit mode
Now, to implement reordering rows of the tableView control that’s on the DetailViewController’s view, you’ll have to first add an Edit button on the view’s navigation bar. So add this code in the DetailViewController.m file’s viewDidLoad method.
// Create an Edit button on the view's navigation bar
self.navigationItem.rightBarButtonItem = self.editButtonItem;
Add this line in the DetailViewController.m file file:
#import “AppDelegate.h”
Next, add this code in the file. It is fired when the operator tap the Edit button, resulting in output you see Figure 1 above.
// This method is fired when the user tap the navigation bar's Edit button
-(void)setEditing:(BOOL)editing animated:(BOOL)animated
{
  [super setEditing:editing animated:animated];
  [self.tableView setEditing:editing animated:animated];
}
Next, add this method in the file as well. It is fired when the user reorder any row of the tableView control.
- (void)tableView:(UITableView *)tableView moveRowAtIndexPath:(NSIndexPath *)fromIndexPath toIndexPath:(NSIndexPath *)toIndexPath
{
  //1. Place the row the operator wants to relocate in a temp variable
  NSString *itemToMove = [self.itemList objectAtIndex:fromIndexPath.row];

  //2. Remove the item the operator is relocating from the itemList array
  [self.itemList removeObjectAtIndex:fromIndexPath.row];

  //3. Put the itemToMove in its new location in the itemList array
  [self.itemList insertObject:itemToMove atIndex:toIndexPath.row];

  //4. Update the shoppListItems.plist file
  AppDelegate *delegate = [[UIApplication sharedApplication] delegate];
  [delegate.self addShoppingListItems:self.tableDataSource];
}
As you can see, the last statement is sending a message to the addShoppingListItems method. You’ll have to declare and implement it in the AppDelegate class.
- (void)addShoppingListItems:(NSDictionary *)records
{
  // Get the full path to the plist file
  self.dataFilePath = [self.getPathToDocumentsDir stringByAppendingPathComponent:@"shoppingListItems.plist"];

  // Fetch all records from the plist file
  //NSDictionary *allRecords = [[NSDictionary alloc] init];
  NSDictionary *allRecords = [self fetchShoppingListItems];

  // Make the allRecords a mutableCopy so we can delete all objects from it
  NSMutableDictionary *mutableAllRecords = [allRecords mutableCopy];

  // Remove all objects from the dictionary
  [mutableAllRecords removeAllObjects];

  // Add dicObjects in the plist file
  [records writeToFile:self.dataFilePath atomically:YES];
}
You can run the app now. Tap the Edit button then reorder the tableView’s rows to your hearts content. When you are done tap the Done button to put the tableView control back in normal mode. Relaunch the application to see that the order you put the tableView rows persisted.