
The main goal of this workshop is to show you how to implement the row selection event performed by the app user.
What We’ll Do?
When the user is presented with a list of categories in the MasterViewController’s tableView control, he should be able to tap a row. The app should respond by displaying a second view that list item names belonging to the selected category, in a tableView control; thus satisfying this workshop’s goal.
Here’s what we’ll do:
Add Code in The AppDelegate Class
We will add code in the AppDelegate class to declare and implement a method called fetchShoppingListItems in the AppDelegate class. It will fetch and return all content from the shoppingListItems.plist file.
Create and Populate a Second Plist File
We will use the createPlistFile method to create a second plist file called shoppingListItems in the application sandbox’s Documents directory. We will use Xcode’s property list editor to add some categories and items in it. We could set up a view and class to permit the app user to add data in the plist file, but we won’t.
Add Code in The MasterViewController Class
Once the plist file is created and populated, we will add code in several methods of the MasterViewController class. One of them is the didSelectRowAtIndexPath method. Code you’ll add in this method will basically pass the category the user selected from the view’s tableView to the DetailViewController class, then load that class’ view in the Simulator.
Add Code in The DetailViewController Class
We’ll have to add code in the DetailViewController class to fetch item names belonging to the category, passed from the MasterViewController class, then list them in the DetailViewController’s tableView control.
Add Code in The AppDelegate Class
The first thing I want you to do is declare and implement the fetchShoppingListItems method in the AppDelegate.h file. As you can see, the method’s code is very much like the fetchShoppingListCategories method’s code.
- (NSMutableArray *)fetchShoppingListItems
{
  // Get the full path to the shoppingListCategories.plist file
  self.dataFilePath = [self.getPathToDocumentsDir stringByAppendingPathComponent:@"shoppingListItems.plist"];

  // Get all data from the plist file, assign it to a dictionary
  NSDictionary *fileContent = [[NSDictionary alloc] initWithContentsOfFile:self.dataFilePath];

  // Return the plist file's data or an empty array
  return fileContent;
}
Create and Populate a Second Plist File
Add this statement in the AppDelegate’s didFinishLaunchingWithOptions method, which create a second plist file in the app’s Documents directory.
- (BOOL)application:(UIApplication *)application didFinishLaunchingWithOptions:(NSDictionary *)launchOptions
{
  // Create two plist files in the app's Documents directory
  [self createPlistFile:@"shoppingListCategories.plist"];
  [self createPlistFile:@"shoppingListItems.plist"];

  self.window = [[UIWindow alloc] initWithFrame:[[UIScreen mainScreen] bounds]];
  // Override point for customization after application launch.
  MasterViewController *masterViewController = [[MasterViewController alloc] initWithNibName:@"MasterViewController" bundle:nil];
  self.navigationController = [[UINavigationController alloc] initWithRootViewController:masterViewController];
  self.window.rootViewController = self.navigationController;
  [self.window makeKeyAndVisible];
  return YES;
}
After enter above code in the didFinishLaunchingWithOptions method, run the application so it can create the shoppingListItems.plist file. Use Finder to verify that the shoppingListItmes.plist file was created in the application sandbox’s Documents folder.
Double-click the shoppingListItems.plist file to open it in the property list editor and add these items in it don’t forget to save the file before closing it.

Add Code in The MasterViewController Class
Once the plist file is created and populated, return to Xcode add this code in the MasterViewController.h file.
#import <UIKit/UIKit.h>

@class DetailViewController;
@class AddItemViewController;

@interface MasterViewController : UITableViewController

@property (strong, nonatomic) DetailViewController *detailViewController;
@property (strong, nonatomic) AddItemViewController *addItemViewController;
@property (strong, nonatomic) NSMutableArray *tableDataSource;
@property (strong, nonatomic) NSArray *itemList;

@end
Switch to the MasterViewController.m file and add highlighted code.
#import "MasterViewController.h"
#import "DetailViewController.h"
#import "AddItemViewController.h"
#import "AppDelegate.h"
Next, add this code in the viewDidLoad method
- (void)viewDidLoad
{
  [super viewDidLoad];

  // Do any additional setup after loading the view, typically from a nib.
  self.navigationItem.leftBarButtonItem = self.editButtonItem;

  UIBarButtonItem *addButton = [[UIBarButtonItem alloc] initWithBarButtonSystemItem:UIBarButtonSystemItemAdd target:self action:@selector(addItem)];

  self.navigationItem.rightBarButtonItem = addButton;

  // Create an object of the AppDelegate so we can use its variables and methods
  AppDelegate *delegate = [[UIApplication sharedApplication] delegate];

  // Get data from the plist file and assign it to a mutable array
  self.tableDataSource = [delegate.self fetchShoppingListCategories];
}
Here’s the code to add in the cellForRowAtIndexPath method.
// Customize the appearance of table view cells.
- (UITableViewCell *)tableView:(UITableView *)tableView cellForRowAtIndexPath:(NSIndexPath *)indexPath
{
  static NSString *CellIdentifier = @"Cell";

  UITableViewCell *cell = [tableView dequeueReusableCellWithIdentifier:CellIdentifier];
  if (cell == nil) {
    cell = [[UITableViewCell alloc] initWithStyle:UITableViewCellStyleSubtitle reuseIdentifier:CellIdentifier];
    cell.accessoryType = UITableViewCellAccessoryDisclosureIndicator;
  }

  // Create an object of the AppDelegate so we can use its variables and methods
  AppDelegate *delegate = [[UIApplication sharedApplication] delegate];

  NSDictionary *dicItems = [delegate.self fetchShoppingListItems];
  NSString *category = [self.tableDataSource objectAtIndex:indexPath.row];

  if ([category isEqualToString:@"Grocery"]) {
    self.itemList = [dicItems objectForKey:@"Grocery"];
  }

  if ([category isEqual: @"Electronics & Appliances"]) {
    self.itemList = [dicItems objectForKey:@"Electronics & Appliances"];
  }

  if ([category isEqual: @"Books"]) {
    self.itemList = [dicItems objectForKey:@"Books"];
  }

  if ([category isEqual: @"Entertainment"]) {
    self.itemList = [dicItems objectForKey:@"Entertainment"];
  }

  if ([category isEqual: @"Health & Beauty"]) {
    self.itemList = [dicItems objectForKey:@"Health & Beauty"];
  }

  if ([category isEqual: @"Office Supplies"]) {
    self.itemList = [dicItems objectForKey:@"Office Supplies"];
  }

  // Configure the cell
  cell.textLabel.text = [self.tableDataSource objectAtIndex:indexPath.row];
  cell.detailTextLabel.text = [NSString stringWithFormat:@"(%i items)",[self.itemList count]];

  return cell;
}
Here’s the code to add in the MasterViewController.m file’s didSelectRowAtIndexPath method.
- (void)tableView:(UITableView *)tableView didSelectRowAtIndexPath:(NSIndexPath *)indexPath
{
  if (!self.detailViewController) {
    // This statement initialize the detailViewController property
    self.detailViewController = [[DetailViewController alloc] initWithNibName:@"DetailViewController" bundle:nil];
  }
  // Pass the category the operator selected to the DetailViewController
  self.detailViewController.selectedCategory = [self.tableDataSource objectAtIndex:indexPath.row];

  // This statement load the DetailViewController view in the device's window
  [self.navigationController pushViewController:self.detailViewController animated:YES];
}
After enter code in the didSelectRowAtIndexPath method, run the application. The MasterViewController’s view will look like this:

Go ahead and tap any row, the detailViewController’s view is load in the device’s window. As you can see, the category name you selected is displayed in the view’s navigation bar.
What you’ve done up to this point is implemented code in the AppDelegate class and the MasterViewController class to fulfill the workshop’s goal, which is to implement the row selection event performed by the app user. All that’s left is to add code in the DetailViewController class to fetch item names belonging to the category, passed to the class, then list them in the view’s tableView control.
Add Code in The DetailViewController Class
I want you to drag a tableView control from the Object Library and drop it on the view’s canvas. Make sure it covers the view’s surface. Next, connect the control’s dataSource and delegate to the File’s Owner object in Interface Builder, the add this code in the DetailViewController.h file.
#import <UIKit/UIKit.h>

@interface DetailViewController : UIViewController

@property (strong, nonatomic) IBOutlet UITableView *tableView;
@property (weak, nonatomic) NSString *selectedCategory;
@property (strong, nonatomic) NSArray *itemList;
@property (strong, nonatomic) NSDictionary *tableDataSource;

@end
Switch to the DetailViewController.m file and add this statement.
#import "DetailViewController.h"
#import "AppDelegate.h"
Next, add this code code in the file.
- (void)viewDidLoad
{
  [super viewDidLoad];
  AppDelegate *delegate = [[UIApplication sharedApplication] delegate];

  // Get data from the plist file and assign it to a mutable array
  self.tableDataSource = [delegate.self fetchShoppingListItems];
}

- (void)viewWillAppear:(BOOL)animated
{
  // Set the navigation bar's title attribute
  self.title = self.selectedCategory;

  // Each if statement assign the category's item names in the itemList array
  // or nothing, if the category has no items
  if ([self.selectedCategory isEqual: @"Grocery"])
    self.itemList = [self.tableDataSource objectForKey:@"Grocery"];

  if ([self.selectedCategory isEqual: @"Electronics & Appliances"])
    self.itemList = [self.tableDataSource objectForKey:@"Electronics & Appliances"];

  if ([self.selectedCategory isEqual: @"Books"])
    self.itemList = [self.tableDataSource objectForKey:@"Books"];

  if ([self.selectedCategory isEqual: @"Entertainment"])
    self.itemList = [self.tableDataSource objectForKey:@"Entertainment"];

  if ([self.selectedCategory isEqual: @"Health & Beauty"])
    self.itemList = [self.tableDataSource objectForKey:@"Health & Beauty"];

  if ([self.selectedCategory isEqual: @"Office Supplies"])
    self.itemList = [self.tableDataSource objectForKey:@"Office Supplies"];

  // Refresh the table
  [self.tableView reloadData];
}
Here is the final set of code to add in the file.
#pragma mark - Table View

- (NSInteger)numberOfSectionsInTableView:(UITableView *)tableView
{
  return 1;
}

- (NSInteger)tableView:(UITableView *)tableView numberOfRowsInSection:(NSInteger)section
{
  return self.itemList.count;
}

// Customize the appearance of table view cells.
- (UITableViewCell *)tableView:(UITableView *)tableView cellForRowAtIndexPath:(NSIndexPath *)indexPath
{
  static NSString *CellIdentifier = @"Cell";

  UITableViewCell *cell = [tableView dequeueReusableCellWithIdentifier:CellIdentifier];
  if (cell == nil) {
    cell = [[UITableViewCell alloc] initWithStyle:UITableViewCellStyleDefault reuseIdentifier:CellIdentifier];
    cell.accessoryType = UITableViewCellAccessoryNone;
  }

  // Configure the cell
  cell.textLabel.text = [self.itemList objectAtIndex:[indexPath row]];
  return cell;
}
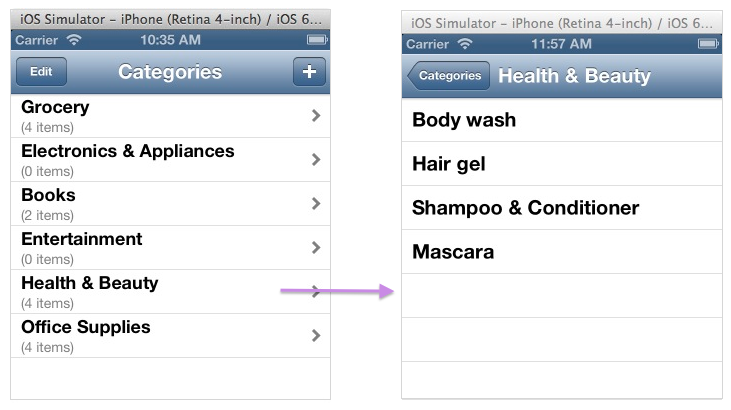
That’s all the code you need to add in the DetailViewController.m file, so run the application, tap a row; for example, Health & Beauty. The app respond by displaying items belonging to the category you selected in the DetailViewController’s tableView control like this:
