
Last week you added code in the AppDelegate class files to create three methods for interacting with the plist file’s data. You added code in the AppDelegate didFinishLaunchingWithOptions method to create a plist file called, glossary.plist in the application sandbox’s Documents directory.
Now, in this workshop, you’ll add code in the MasterViewController.m file’s viewDidLoad method to add content in the plist file. You will also add code in the file’s tableView control methods to make its view functional.
Ok, so you know what you’ll do in this workshop, so launch the PropertyListDemo project in Xcode. Click the MasterViewController.m file and add highlighted code in the viewDidLoad method.
- (void)viewDidLoad
{
  [super viewDidLoad];
  // Display instructions in the messageLabel control
  self.messageLabel.text = @"INSTRUCTIONS:\n\n1. Tap a word to see its definition here.\n2. Scroll to see more words.";

  // Create an object of the AppDelegate so we can use its variables and methods
  AppDelegate *delegate = [[UIApplication sharedApplication] delegate];

  // Fetch all content from the plist file and place them in the tableDataSource dictionary
  self.tableDataSource = [delegate.self retrieveGlossary];

  // This if statement check to see if the dictionary is empty
  if (self.tableDataSource.count == 0) {
    // The dictionary is empty, so add 12 entries (key-value) in the plist file
    [delegate.self addGlossary:@"Delegate" andField2:@"-An object that acts on behalf of another object."];

    [delegate.self addGlossary:@"Encapsulation" andField2:@"-The principle of hiding an object's data; thus, guaranteeing the integrity of the data contain in the object."];

    [delegate.self addGlossary:@"event" andField2:@"-The direct or indirect report of external activity, especially user activity on the keyboard and mouse."];

    [delegate.self addGlossary:@"assignment operator" andField2:@"—The equal sign (=)."];

    [delegate.self addGlossary:@"assignment" andField2:@"—The act of explicitly stating the value of a variable."];

    [delegate.self addGlossary:@"array" andField2:@"—A list of individual items that all have the same type."];

    [delegate.self addGlossary:@"BOOL" andField2:@"—The keyword used to declare Boolean variables that have only two possible values-YES/NO."];

    [delegate.self addGlossary:@"method or function call" andField2:@"—The statement that executes a method or a function."];

    [delegate.self addGlossary:@"data field" andField2:@"-One piece of data, such as a first or last name, phone or Social Security number, or salary."];

    [delegate.self addGlossary:@"data type" andField2:@"—The characteristic of a variable that defines what kind of values may be stored in the variable, how much storage it occupies, and what kinds of operations can be performed on it."];

    [delegate.self addGlossary:@"message"  andField2:@"—A passed object that contains information."];

    [delegate.self addGlossary:@"whitespace" andField2:@"—Any number of spaces, tabs, and Enter characters."];

    // The plist file is no longer empty, so fetch all content and place them in the tableDataSource dictionary
    self.tableDataSource = [delegate.self retrieveGlossary];
  }
}
Next, add this code in the tableView control’s dataSource methods.
#pragma mark - Table view data source

- (NSInteger)numberOfSectionsInTableView:(UITableView *)tableView
{
  // Return the number of sections.
  return 1;
}

- (NSInteger)tableView:(UITableView *)tableView numberOfRowsInSection:(NSInteger)section
{
  // Return the number of rows in the section.
  return self.tableDataSource.count;
}

- (UITableViewCell *)tableView:(UITableView *)tableView cellForRowAtIndexPath:(NSIndexPath *)indexPath
{
  static NSString *CellIdentifier = @"Cell";
  UITableViewCell *cell = [tableView dequeueReusableCellWithIdentifier:CellIdentifier];
  if (cell == nil) {
    cell = [[UITableViewCell alloc] initWithStyle:UITableViewCellStyleDefault reuseIdentifier:CellIdentifier];
  }

  // Configure the cell...
  NSArray *allKeys = [self.tableDataSource allKeys];
  cell.textLabel.text = [allKeys objectAtIndex:indexPath.row];
  return cell;
}
Finally, add this code in the tableView control’s delegate method.
#pragma mark - Table view delegate
- (void)tableView:(UITableView *)tableView didSelectRowAtIndexPath:(NSIndexPath *)indexPath
{
  // Code in this method display a glossary in the messageLabel for the row the user selected
  NSArray *allKeys = [self.tableDataSource allKeys];
  NSArray *allValues = [self.tableDataSource allValues];
  NSString *key = [allKeys objectAtIndex:indexPath.row];
  NSString *value = [allValues objectAtIndex:indexPath.row];

  for (int i=0; i < allKeys.count; i++) {
    if (i == indexPath.row)
        self.messageLabel.text = [key stringByAppendingFormat:@"%@",value];
  }
}
Once you are done entering code in the MasterViewController.m file, run the application. Once Xcode finish building the project, the MasterViewController’s user interface will look like the image shown in Figure 1. Clicking a row display that row’s word and definition in the textView control, as shown in the Figure 2.
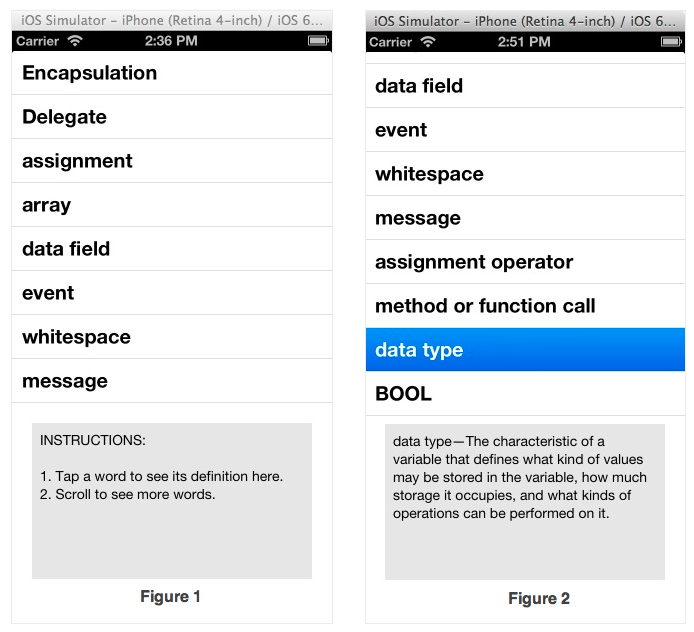 Figure 1 |
This concludes Property List Workshop series. By developing the PropertyListDemo application in the series you learned the follow:
- How to create a property list file in the application sandbox’s Documents directory
- Add content in the property list file
- Fetch content from the property list file and place it in an Objective-C NSMutableDictionary variable
- Display the property list file’s content in a tableView control and a textView control