
So far, you learned how to implement these features in the SwiftCollectionView application:
Today, you will learn how to implement these feature in the SwiftCollectionView application:
- Display the collection view cells in multiple sections.
- Display section headers and footers in the collection view.
- Update the Delete button’s code to enable the app user to delete one or more cells from each section of the collection view.
The QuickTime Player video below shows what the app will look like and how it will function once we’ve implemented above features in the app.
Before we begin, I assume the following:
- You created a new branch from the collection-view-plist branch and you called it multiple-sections-headers-footers.
- You will use Xcode Version 6.1.1 to implement above features in the SwiftCollection project.
- You’ve worked through the previous 8 phases of the Swift Collection View tutorial.
In addition to the above, I will provide a lot of comments in the source code. Make sure you read them, so you can understand what the code does.
The Photos.plist File
The first task on the feature list is to display collection view cells in multiple sections. To implement that feature in the SwiftCollectionView app, we have to do several tasks. The first one involves modifying the plist file. Luckily I’ve done that for you. All you have to do is replace the existing plist file with this one.
As you can see in Figure 9-1 below, the photos.plist file’s data is in a dictionary and it has four entries (Key-Value pairs). The dictionary’s “Keys” will serve as the collection view’s section headers. The dictionary’s “Values” will serve as the collection view cells. So the collection view will have four sections of cells. For example, the first section will display 11 cells. That’s because the Actors key has 11 elements in its value Array. Take a look at the expanded Actors Key, shown in Figure 9-1 to see what I mean.
 |
| Figure 9-1 |
Revamp the collection view’s DataSource code
The second thing you have to do is, modify the collection view’s dataSource code so the collection view cells’ data are displayed in four sections, instead of one. In this version of the project, the collection view’s dataSource will consist of these Swift variables: plistData, albumList, photoList, and we’ll create them at the top of the MasterViewController.swift file.
plistData
This will be a Swift Array variable and it will hold the photos.plist file’s dictionary Values, which are arrays themselves. In Figure 9-2 below, they are called actors, animals, flowers, other. The last element in the plistData variable will hold all of the dictionary keys. In the image below it is called sortedAlbums.
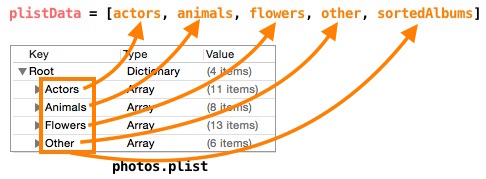
Figure 9-2
albumList
This will be a Swift String array and it will hold the dictionary’s Keys. In other words, we’ll pull the last array element from the plistData variable and add them in the albumList. We’ll do that in the MasterViewController.swift file’s viewDidLoad() function. We’ll use the albumList variable in one of the collection view’s dataSource function and in a function that display section headers and footers in the collection view.
photoList
This will be a Swift String array and it will hold the dictionary array values. In other words, we’ll pull the first four elements of the plistData array and add them in the photoList array. We’ll do that in the MasterViewController.swift file’s viewDidLoad() function. We’ll use the photoList array in several functions of the MasterViewController.swift file.
The collection view dataSource functions
Here are the source code to add in the collection view’s dataSource functions. They are located in the MasterViewController.swift file.
override func numberOfSectionsInCollectionView(collectionView: UICollectionView) -> Int {
        // Return the number of sections
        return albumList.count
    }

    override func collectionView(collectionView: UICollectionView, numberOfItemsInSection section: Int) -> Int {
        // Return the number of items in the section
        var sectionItems: Array = photoList[section] as [String]
        return sectionItems.count
    }

    override func collectionView(collectionView: UICollectionView, cellForItemAtIndexPath indexPath: NSIndexPath) -> UICollectionViewCell {
        // Initialize the reusable Collection View Cell with our custom class
        icon = collectionView.dequeueReusableCellWithReuseIdentifier(reuseIdentifier, forIndexPath: indexPath) as PhotoCell

        // Put the current section urls in a variable
        var sectionUrls: Array = photoList[indexPath.section]
        var currentLink: String = sectionUrls[indexPath.item]

        // Convert the string variable (currentLink) to an Array variable (stringArray)
        var stringArray: Array = currentLink.componentsSeparatedByString("/")

        // Remove the last element (i.e Edris-Elba.jpg) from the stringArray and put it in a string variable (link)
        var photoFileName = stringArray.removeLast()

        // Convert the string variable (link) to an Array variable (stringObjectArray)
        var stringObjectArray = photoFileName.componentsSeparatedByString(".")

        // Configure the collection view cell
        icon.caption.text = stringObjectArray[0]
        imageCache.setImage(icon.imageView, imgUrl: currentLink)

        if self.navigationItem.rightBarButtonItem!.title == "Edit" {
            icon.deleteButton.hidden = true
        } else {
            icon.deleteButton.hidden = false
             icon.shakeIcons()
        }

        // Give the delete button an index number
        icon.deleteButton.layer.setValue(indexPath.row, forKey: "index")

        // Add an action function to the delete button
        icon.deleteButton.addTarget(self, action: "deletePhotoCell:", forControlEvents: UIControlEvents.TouchUpInside)

        // Return the cell
        return icon
    }
Revamp the collection view delegate function code
You already know that the collection view’s delegate function, didSelectItemAtIndexPath() tells the delegate (which is the MasterViewController class), that the item at the specified index path was selected. We’ll modify the function’s code by adding a switch statement that basically pull a photo url from the photoList array and assign it to a variable called selectedPhotoUrl. The last statement in the function will pass the selectedPhotoUrl over to the PhotoDetailViewController class file.
Here’s the new source code to add in the collection view’s delegate function.
override func collectionView(collectionView: UICollectionView, didSelectItemAtIndexPath indexPath: NSIndexPath) {
        var photoUrls = [String]()

        // This switch statement pull a photo url from the photoList array
        // and assign it to the selectedPhotoUrl variable
        switch(indexPath.section) {
        case 0:  // Actors album
            photoUrls = photoList[0] as [String]
            selectedPhotoUrl = photoUrls[indexPath.row]

        case 1:  // Animals album
            photoUrls = photoList[1] as [String]
            selectedPhotoUrl = photoUrls[indexPath.row]

        case 2:  // Flowers album
            photoUrls = photoList[2] as [String]
            selectedPhotoUrl = photoUrls[indexPath.row]

        case 3: // Other album
            photoUrls = photoList[3] as [String]
            selectedPhotoUrl = photoUrls[indexPath.row]
        default:
            println("Invalid selection")
        }

        // Pass control to the PhotoDetailViewController
        self.performSegueWithIdentifier("photoDetail", sender:self)
    }
Revamp the fetchPlistData() function code
Now, in order to populate the collection view dataSource variables, we’ll modify the existing fetchPlistData() function’s code. As you already know, its job is to fetch the dictionary entries from the photos.plist file, add them in a dictionary variable, then return it to the caller of the function. In this version of the SwiftCollectionView project, we’ll modify the fetchPlistData() function’s header and code so it returns a Swift array consisting of five array elements-see Figure 9-2 above.
Here is the new source code to add in the fetchPlistData() function.
func fetchPlistData() -> [[String]] {
        // Fetch data from the plist file and put it in an Obj-C dictionary
        let path = NSBundle.mainBundle().pathForResource("photos", ofType: "plist")
        var dictionary = NSDictionary(contentsOfFile: path!)!

        // Put the dictionary entries in a Swift Array
        var actors = dictionary["Actors"] as [String]
        var animals = dictionary["Animals"] as [String]
        var flowers = dictionary["Flowers"] as [String]
        var other = dictionary["Other"] as [String]

        // Put the dictionary keys in a Swift Array
        var albums = dictionary.allKeys as [String]

        // Put the albums array elements in alphabetical order
        var sortedAlbums = sorted(albums, { (s1: String, s2: String) -> Bool in
            return s1 < s2
        })

        // Put the dictonary entries and keys in a Swift Array
        var collection: Array = [actors, animals, flowers, other, sortedAlbums]

        /************* DEBUG CODE ***************
        println("The directory path is:\(path)\n-------------------------------\n")

        for entry in collection {
            for row in entry {
                println("\(row)")
            }
        }
        ****************************************/

        // Return plist data or an empty Swift Array
        return collection
    }
Revamp the viewDidLoad() function code
We have to modify the MasterViewController.swift file’s viewDidLoad() code to initialized the collection view’s dataSource array variables. We’ll also add debug code to loop through the photoList array and print its elements in Xcode’s debugger window.
Here’s the source code to add in the viewDidLoad() function.
override func viewDidLoad() {
        super.viewDidLoad()

        // Set the collection view's backgroundcolor to display an image
        self.collectionView!.backgroundColor = UIColor(patternImage: UIImage(named: "purty_wood")!)

        // Register the class with the collection view
        self.collectionView!.registerClass(PhotoCell.self, forCellWithReuseIdentifier: reuseIdentifier)

        // Initialize the collection view's dataSource array variables
        plistData = fetchPlistData()
        albumList = plistData.removeLast()
        photoList = plistData

        /************* DEBUG CODE ***************/
        //println("\(albumList)\n")
        for entry in photoList {
            for row in entry {
                //println("\(row)")
            }
        }
       /******************************************/
    }
That’s the low down in configuring the SwiftCollectionView project to display the collection view cells in four sections.
Test The Collection View Code
Go ahead and run the application in the iPhone or iPad simulator. You should see output shown in the image below. When you tap the collection view, you should still see the Detail View on the simulator’s screen.
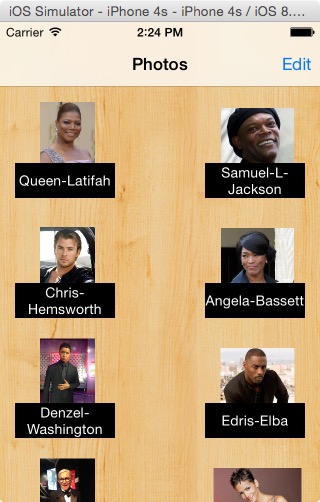
Figure 9-3
What you’ve done so far is modify the MasterViewController.swift file’s code to implement this feature in the project: Display the collection view cells in multiple sections. Now, let us get to work in implementing the next feature in the project.
Display Section Headers in The Collection view
Ok, the collection view is displaying cells and you can tap a cell to display the Photo Detail View. Now you have to display section headers in the collection view. The process of adding section headers in the collection view involves multiple steps, so I will do my best to explain the steps before we actually do them.
Add a section header cell in the collection view
In Interface Builder we’ll add s section header cell in the collection view. A section header cell is a reusable view-just like the collection view cell. We’ll add two Label views in the section header cell. One for displaying the photos.plist file’s dictionary key; the other will display the total number of values a key have. You can see this in Figure 9-4 below. In Interface Builder, we’ll set these properties for the section header cell’s label views: Color, Font, Background.
 |
| Figure 9-4 |
Here are the steps to add a section header cell in the Photos scene’s collection view.
- Click the Main.storyboard file to load it in Interface Builder.
- Click the Photos scene’s collection view.
- In the Attributes inspector, tick the Section Header checkbox. This action add a section header cell above the collection view cell-see Figure 9-5 below.

Figure 9-5
Here are the steps to add two Label views in the section header cell and set their Color, Background, and Font attributes.
- Select the section header cell. Drag a Label from the Object library and drop it on left side of the section header cell.
- In the Attributes inspector, set the Label’s Color attribute to White, set its Font attribute to System Bold 17.0, and set its Background attribute to Black.
- Use Xcode’s Editor | Size to Fit Content menu to adjust the Label’s size.
- Option-drag the Label to make a copy, then move it over to the right side of the section header cell.
After performing above steps, the section header cell should look like Figure 9-6 below. As you can see in the image below; I’ve give each label a name. I will use these names from now on.

Figure 9-6
Reset the Photos scene constraints
Since you added more objects on the Photos scene, you have to reset the scene’s constraints for the wAny hAny size class. Here’s how to do that.
- Make sure the wAny hAny size class is selected for the Photos scene.
- Click the scene object.

- Click the Issues button in the Auto Layout bar.

- From the pop up menu select, Reset to Suggested Constraints.
Set the section header labels text properties in code
In code you have to set each section header’s album label and photo counter label’s text property. Before you do that though, there are several things you have to do.
The first thing you have to do is to add a Cocoa Touch Class in the project for the section header cell. This image shows options to provide for the class.

Figure 9-7
The second thing you have to do is add code shown below in the CellHeaderFooter class which; declare an IBOutlet variable for the section header’s album label and the photo counter label.
import UIKit

class CellHeaderFooter: UICollectionReusableView {

    @IBOutlet weak var headerLabel1: UILabel!
    @IBOutlet weak var headerLabel2: UILabel!
}
The third and fourth thing you have to do is connect the CellHeaderFooter class to the section header cell and set the Identity attribute. Here are the steps to do them.
- Click the Main.storyboard file to load it in Interface Builder.
- Click the section header cell. In the Identity inspector, select CellHeaderFooter from the Class menu.
- Make sure the section header cell is still selected. In the Attributes inspector, enter HeaderView in the Identifier field. After performing this step, the warning issue goes away.
The fifth thing you have to do is connect the section header labels to their respective IBOutlet variables; which you declared in the CellHeaderFooter.swift file. Here are the steps to do it.
- Make sure the section header cell is still selected and click the Assistant editor button. This load the CellHeaderFooter.swift file in the Assistant editor’s code editor.
- Click-drag from the first circle to the album label-see Figure 9-8 below. Release your mouse when the label is highlighted.
- Repeat step 2 to connect the photo counter label to the headerLabel2 IBOutlet variable.

Figure 9-8
The last thing you have to do is conform the MasterViewController class to the UICollectionViewDelegateFlowLayout protocol. The reason why you have to do that is because you’ll implement this delegate function in the MasterViewController.swift class file:
viewForSupplementaryElementOfKind().
It is a member of theUICollectionViewDelegateFlowLayout protocol. To conform the MasterViewController class to the UICollectionViewDelegateFlowLayout protocol, do the following:
- Hide the Assistant editor, if it showing, by clicking the Standard editor button on Xcode’s Toolbar.
- Click the MasterViewController.swift class file to load it in the standard editor.
- Change the class file’s header so it look like this:
class MasterViewController: UICollectionViewController, UICollectionViewDelegateFlowLayout{
Add code in the viewForSupplementaryElementOfKind() function
Remember earlier on I said you have to set each section header’s album label and photo counter label’s text property, in code. Well you do that by adding code shown below in the viewForSupplementaryElementOfKind() delegate function.
override func collectionView(collectionView: UICollectionView, viewForSupplementaryElementOfKind kind: String, atIndexPath indexPath: NSIndexPath) -> UICollectionReusableView {

        // Create an instance of the CellHeaderFooter
        var reuseableView: CellHeaderFooter!

        // Setup the section header label controls' properties
        if(kind == UICollectionElementKindSectionHeader!) {
            reuseableView = collectionView.dequeueReusableSupplementaryViewOfKind(kind, withReuseIdentifier: "HeaderView", forIndexPath: indexPath) as CellHeaderFooter

            if indexPath.section == 0 {
                var photoUrls = photoList[0]
                reuseableView.headerLabel1.text = " Album: \(albumList[0]) "
                reuseableView.headerLabel2.text = " Photos: \(photoUrls.count) "
            }

            if indexPath.section == 1 {
                var photoUrls = photoList[1]
                reuseableView.headerLabel1.text = " Album: \(albumList[1]) "
                reuseableView.headerLabel2.text = " Photos: \(photoUrls.count) "
            }

            if indexPath.section == 2 {
                var photoUrls = photoList[2]
                reuseableView.headerLabel1.text = " Album: \(albumList[2]) "
                reuseableView.headerLabel2.text = " Photos: \(photoUrls.count) "
            }

            if indexPath.section == 3 {
                var photoUrls = photoList[3]
                reuseableView.headerLabel1.text = " Album: \(albumList[3]) "
                reuseableView.headerLabel2.text = " Photos: \(photoUrls.count) "
            }
        }

        // Return the header reusableView object
        return reuseableView
    }
Code you added the viewForSupplementaryElementOfKind() function does the following for each section header cell that’s shown in the collection view:
- Set the album label’s Text property.
- Set the photo counter label’s Text property.
By the way, when you delete a section’s collection view cell in the collection view. The app dynamically update the photo counter label’s Text property to reflect the number of elements (photo urls) remaining in that particular section. For example, say you deleted three cells in the second collection view section, the photo counter label will now display this:
Photos: 5
Test The Section Header Code
That’s it. You’ve modified the project to display section headers; so run the app in the iPhone or iPad simulator to see the fruit of your labor. Ta da! Headers appears above each section of cells, in the collection view. Here’s what, the last section header should look like on the iPhone simulator screen.

Display Section Footers in The Collection View
The third feature we have to implement in the SwiftCollectionView project is this:
Display section footers in the collection view.
Implementing this feature is very much like implementing the section header feature. So let’s get to work. The first thing you have to do is add a section footer cell below the existing collection view cell.
Click the collection view, then tick the Section Footer check box in the Attributes inspector. Like the section header cell; the section footer view is a reusable view.
The second thing you have to do is add an image view in the section footer cell. To do that, just drag one from the Object Library and drop it in the section footer cell. Resize it so it is the same length and width as the section footer cell.
Now, in the Identity inspector, connect the section footer cell to the CellHeaderFooter class. Once you’ve done that; use the Assistant editor to create and connect an IBOutlet variable called, footerImageView for the image view.
Next, click the Photos scene object and use the Auto Layout bar’s Issue button to “Reset to Suggested Constraints” for the wAny hAny size class. Take a look at Figure 9-10; it shows what the section footer cell should look like in Interface Builder.

Figure 9-10
In code, you’ll set the section footer image view’s image property to display this png image. So, click the image to open it in a new tab/window. Drag-and-drop it on your Mac’s Desktop. Next, drag-and-drop the image in the SwiftCollectionView project’s Images.xcassets folder.

Now, switch to the MasterViewController.swift file and add highlighted code shown below in the viewForSupplementaryElementOfKind() function.
override func collectionView(collectionView: UICollectionView, viewForSupplementaryElementOfKind kind: String, atIndexPath indexPath: NSIndexPath) -> UICollectionReusableView {

        // Create an instance of the CellHeaderFooter class
        var reuseableView: CellHeaderFooter!
        // Setup the section header label controls' properties
        if(kind == UICollectionElementKindSectionHeader!) {
            reuseableView = collectionView.dequeueReusableSupplementaryViewOfKind(kind, withReuseIdentifier: "HeaderView", forIndexPath: indexPath) as CellHeaderFooter

            if indexPath.section == 0 {
                var photoUrls = photoList[0]
                reuseableView.headerLabel1.text = " Album: \(albumList[0]) "
                reuseableView.headerLabel2.text = " Photos: \(photoUrls.count) "
            }

            if indexPath.section == 1 {
                var photoUrls = photoList[1]
                reuseableView.headerLabel1.text = " Album: \(albumList[1]) "
                reuseableView.headerLabel2.text = " Photos: \(photoUrls.count) "
            }

            if indexPath.section == 2 {
                var photoUrls = photoList[2]
                reuseableView.headerLabel1.text = " Album: \(albumList[2]) "
                reuseableView.headerLabel2.text = " Photos: \(photoUrls.count) "
            }

            if indexPath.section == 3 {
                var photoUrls = photoList[3]
                reuseableView.headerLabel1.text = " Album: \(albumList[3]) "
                reuseableView.headerLabel2.text = " Photos: \(photoUrls.count) "
            }
        }

        // Setup the section footer image View control property
        if (kind == UICollectionElementKindSectionFooter!) {
            reuseableView = collectionView.dequeueReusableSupplementaryViewOfKind(kind, withReuseIdentifier: "FooterView", forIndexPath: indexPath) as CellHeaderFooter
            reuseableView.footerImageView.image = UIImage(named: "antelope-canyon")
        }

        // Return the header/footer reusableView object
        return reuseableView
    }
That’s it, you’ve perform necessary tasks to implement this feature in the SwiftCollectionView project: Display section footers; so run the app again in the iPhone simulator. You will now see a section footer a the bottom of ever section of cells, in the collection view.
Update the Delete Button Code
The final feature you have to implement in the SwiftCollectionView project is this:
Update the Delete button’s code to enable the app user to delete one or more cells from each section of the collection view.
Implementing this feature in the project is super easy. All you have to do is locate the deletePhotoCell() in the MasterViewController.swift file and replace its code with this one:
func deletePhotoCell(sender:UIButton) {
        // Put the index number of the delete button the user tapped in a variable
        let i: Int = (sender.layer.valueForKey("index")) as Int

        // Loop through the visible collection view cells
        for item in self.collectionView!.visibleCells() as [PhotoCell] {
            var indexPath: NSIndexPath = self.collectionView!.indexPathForCell(item as PhotoCell)!
            // This if statement says is the current row's index number is the same as the delete button's own?
            if indexPath.row == i {
                /************** DEBUG CODE *******************
                println("\nindexPath.row: \(indexPath.row), deleteButton index: \(i)")
                */

                // They are the same so remove an object from the collection view's dataSource for the current section
                photoList[indexPath.section].removeAtIndex(i)

                // Refresh the collection view right away
                self.collectionView!.reloadData()

                // Exit the for loop
                return
            }
        }
    }
When you run the application in the iPhone or iPad simulator; the collection view cells’ delete buttons work now.
Bonus App
As a demonstration on how to use a collection view in a split view controller. I used the Master-Detail Application template to create a new iOS project called PhotoAlbum. You can download that project by clicking the link provided at the end of this page.
The App Views
The PhotoAlbum app have three views: Albums, Photos, and Photo Detail. The first two serve as the split view controller’s views. Figure A and B below shows what they look like on the iPhone 6 Plus simulator. Figure C shows what the third app view look like on the iPhone 6 Plus simulator.
 Figure A |
 Figure B |
 Figure C |
|
The App Data Model
The app data model consist of a plist file called photos.plist and its has four dictionary entries. The dictionary keys serve as the table view’s data source. The dictionary values serve as the collection view’s data source.
The App User Tasks
When you launch the PhotoAlbum app, say in the iPhone 6 Plus simulator, you’ll use its views to perform these tasks.
- View collection view cells in a single section by clicking a row in the table view-see Figure A above.
- Remove cells from the collection view, once you put it in edit mode. By the way; the app automatically update the section header photo counter label and the collection view, when you remove its cells-see Figure B above.
- Take the collection view out of edit mode by clicking the navigation bar’s Done button.
- View a photo, by clicking a cell in the collection view-see Figure C above.
That’s pretty much all I have to say about the iOS Photo Album application; so click the image shown below to download the app and take it for a spine on your your iOS device or the iOS Simulator.

You’ve reach the end of the Swift Collection View workshop series. Please leave a comment. Until next time, happy coding! 🙂