
Last week you were introduced to the Collection View Control and its components. You got a bird’s eye view of the BevUp! application we will create. I also gave you a bird’s eye view of the application’s data model.
Our Objectives
Today you’ll create the BevUp! application. You will design the first view to look like Figure 1 below. You will add code in the view’s class files to implement “System Tasks” listed in the table below.
| App User Tasks | System Tasks |
|---|---|
The user launch the application. |
The system respond by performing these tasks.
|
Create The BevUp! Application
Launch Xcode and create a new project using the “Single View Application” template. Provide options shown in Figure 3 below.
 |
| Figure 3: New Xcode project options |
Take a look at Figure 4 below, it shows what the template created for us. As you can see, it created a default View Controller scene on the storyboard’s canvas and a viewController class in the Project Navigator for us. The template also connected the scene to the ViewController class for us.
 |
| Figure 4: The BevUp! project’s folders and files |
Setting Up Shop
We’ll have to perform several tasks before perform systems tasks which involves designing Drink Recipe view and coding its class files.
Step 1: Change The Class Name
Click the ViewController.h file, then highlight the class name on line 11-see image below. Use Xcode’s Edit | Refactor | Rename menu item to change the ViewController class name to DrinkRecipesViewController.h

Step 2: Add Images in The Project
We’ll need an image to use as the Collection View’s background. We’ll also need an image as a placeholders in the the Collection View’s image view controls. Download this file; contain images we’ll use for the Collection View’s background, and as a placeholder for the Collection View Cells’ image views.
bevup-assets
After unzipping the file, drag-and-drop all four images in the Images.xcasset folder.
Step 3: Add The Plist File in The Project
I’ve already created the plist file we’ll use in the BevUp! application. All you have to do is download and unzip it, then drag-and-drop the DrinkList.plist file in the BevUp! folder.
DrinkList
As you can see in Figure 5 below, the plist file has an array called Root and it has 33 array items. One of the Root array item is expand in the image and I’ve noted its elements. In fact, you can think of each “array element” of the Root array as a Recipe object with five properties as shown in the class diagram in Figure 6.
 |
 |
| Figure 5: The DrinkList.plist file | Figure 6: Class Diagram of a Recipe object |
Step 4: Download The SDWebImage Library
The app will have to download images from web address that point to recipe image, then load them in 33 Collection View Cells’ Image View controls. The download process will interfere with the Collection View’s scrolling mechanism-scrolling will be jerky. To fix that problem, we’ll have the app download the drink recipe images in the background, while the user is using the the app. While images are downloading, the app will load an image called placeholder.png in the Collection View Cells’ Image View controls.
Here is the link to download the library that’ll enable the app to download web images in the background.
SDWebImage-master
Once the download is complete, unzip the file. Expanding the SDWebImage-master folder, drag-and-drop the SDWebImage folder in the application’s BevUp! folder.
Step 5: Import The UIImageView+WebCache.h File
Add this import directive in the DrinkRecipesViewController.h file.
#import "SDWebImage/UIImageView+WebCache.h"
By importing the UIImaeView+WebCache.h file in our class, we’ll be able to use the setImageWithURL: method in the DrinkRecipesViewController.m file. That method will download drink recipe images in the background while the app is running and load the placeholder.png image in the Collection View Cells’ Image View controls.
Step 6: Configure the iOS Simulator
Launch the iOS Simulator as shown in the image below. Select Window > Scale > 75%. Then select Hardware > Device > iPad. Switch to Xcode and set the active schema on the Toolbar to iPad. That’s it we’re done setting up shop.

Design The Drink Recipes Scene
It is time to design the BevUp! application’s Drink Recipes View Controller scene. Start by click the Main.storyboard file to load it in the storyboard file in Interface Builder.
- Add a Search Bar on the Drink Recipes View Controller Scene.
- Use its sizing handle to match the view’s own.
- In the Attributes inspector, type “Enter the recipe name here” in the Placeholder box.
- Add a Collection View on the scene, just below the Search Bar.
- Use its sizing handles to cover the view’s surface.
- Click the Collection View, then in the Size inspector I want you to set these attributes for the Collection View Size item.

- Click the Attributes inspector and set the Scroll Direction to Horizontal.

Here’s what the Drink Recipes View Controller Scene should look like now.

Test The DrinkRecipes View’s Interface
Now is a good time as any to run the application to test the DrinkRecipes view’s interface in the iPad simulator. So run the application and the Drink Recipes view will look like this:

The RecipeCell Class
Ok, we have to add code in the DrinkRecipesViewController files to populate the view’s Collection View with Collection View Cells; but first, we have to create a class called RecipeCell in the project. It will contain properties and methods shown in the class diagram you see in Figure A below.
 |
 |
| Figure A | Figure B |
The Class Properties
deleteButtonImg – This property will hold an image we’ll create programmatically and we’ll add it on the deleteButton. Figure B above shows what it will look like in the upper left corner of a Collection View Cell.
MARGIN – This constant defines the red circle’s dimension. We’ll use it in code that create the image for the deleteButton.
The Class Methods
initWithFrame: – This a Cocoa initializer method. It takes a single parameter and return object of type id or nil. Further more, the method is automatically fired when we use the RecipeCell class to create an object.
The initWitFrame: method’s job is to create a custom Collection View Cell and return it to its receiver, which is the Collection View we added on the Drink Recipes View Controller scene. The reason why the method create and return a Collection View Cell is because we made the RecipeCell class a “Subclass of” of the UICollectionViewCell class. Don’t forget that the UICollectionViewCell class is for creating Collection View Cells, for a Collection View.
Now, we will add three statements in the method. The first statement we’ll add in the initWithFrame: method will invoke its superclass (supper) initializer, assign the result that class’ initializer returns, to the RecipeCell class’ self object; which is a frame object. If the superclass returns a nil object (nothing), then the initWithFrame: method is unable to do its job; so it returns the nil object to its receiver; as you already know is a Collection View.
The next statement we’ll add in the initWithFrame: method is an If() statement; its job is to check the self object to see if contain a frame object for a Collection View Cell. If the self object have a frame, code within the if() block are executed. Now, we’ll have to add code in the if() block to do the following:
- Create and initialize UIView object called insetView.
- Initialize the imageView object we declared in the RecipeCell.h file.
- Customize the imageView object by setting a few of its properties. One of these settings will make the imageView’s corners round.
- Add the customized imageView in the insetView.
- Initialize the label object we declared in the RecipeCell.h file.
- Customize the label by setting a few of its properties. Fore example; we’ll set the label’s numberOfLines property to, 2. We’ll also set the label’s lineBreakMode property to add words on the second line, if they don’t fit on the first line.
- Add the customized label in the insetView.
- Initialize the deleteButton object we declared in the RecipeCell.h file.
- Create a frame called buttonFrame and initialize it with the deleteButton’s frame.
- Create and initialize a red circle with a white cross hair in it; then put it in the deleteButtonImg object.
- Set the deleteButton’s image property with the deleteButtonImg we just created.
- Add the deleteButton object in the Collection View’s contentView object.
The final statement in the initWithFrame: method we’ll will return to its receiver (a Collection View) a Collection View Cell or nil (nothing).
Take a look at this box; it shows the hierarchy of objects the initWithFrame: method creates in the Collection View’s contentView object. By the way, the contentView is a subview of a Collection View Cell.
contentView
  insetView
    imageView
    label
  deleteButton (with an image of a red circle)
So to recap, the initWithFrame: method takes a single parameter called, frame. It creates a Collection View Cell with two custom objects, which are called subviews. Return the Collection View Cell to its receiver (a Collection View). The method also create a custom deleteButton object and a custom UIView object called insetView, then add both objects in the Collection View’s contentView.
startShakingIcons – First of all this method’s job is to animate (shake) the Collection View’s Cells. We’ll use an instance of the CABasicAnimation class to animate the Collection View Cells on request. The method takes no parameter and return nothing. Also, the CABasicAnimation class is located in the QuartzCore library; therefore, we’ll have to import it in the RecipeCell.h file.
stopShakingIcons – This method does the opposite of the startShakiingIcons method-it stop animating (shaking) the Collection View Cells. It will also set the deleteButton’s hidden boolean variable to YES; thus hiding the deleteButton object that’ll appear in the upper-left corner of a Collection View Cell as shown in Figure B above.
Create The RecipeCell Class in The Project
Ok, so you’ve gotten an intimate view of the RecipeCell class. Now, use these images as a guide to create it in the project. Make it a Subclass of the UICollectionViewCell class.

Once Xcode have created the class in the project, return to the storyboard file to connect the RecipeCell class to the Collection View Cell. Click the Collection View Cell in the Document Outline. In the Identity inspector, select “RecipeCell” from the Class drop-down menu.

Add Code in The RecipeCell Files
Ok, here is the code to add in the RecipeCell.h file.
#import <UIKit/UIKit.h>
#import <QuartzCore/QuartzCore.h>

@interface RecipeCell : UICollectionViewCell {
  UIImage *deleteButtonImg;
  #define MARGIN 2
}

@property (nonatomic, strong) UILabel *label;
@property (nonatomic, strong) UIImageView *imageView;
@property (nonatomic, strong) UIButton *deleteButton;

- (void)startShakingIcons;
- (void)stopShakingIcons;

@end
We imported the QuartzCore class so we can animate the Collection View Cells. Next, we declared the class properties and methods.
- The deletButtonImg is for holding the round red button image we’ll create in the implementation file’s initWithFrame: method.
- The MARGIN constant determines the deleteButtonImg dimension. The label control is for holding a drink recipe’s name.
- The imageView is for holding a drink recipe image, which we’ll customize to look like an icon with round corners.
- The deleteButton will display an image which we’ll create in the implementation file’s initWithFrame: method.
- The startShakingIcons method will animate (shake) the Collection View Cells and labels.
- The stopShakingIcons will stop the animation.
Moving along, here is the code to add in the RecipeCell.m file.
#import "RecipeCell.h"

static UIImage *deleteButtonImg;
#define MARGIN 2

@implementation RecipeCell

// This method create a new Collection View Cell, code in the if statement add an imageView,
// a Label, and a deleteButton in it
- (id)initWithFrame:(CGRect)frame
{
  self = [super initWithFrame:frame];
  if (self) {
    // Create a container for holding other objects (imageView and label)
    UIView *insetView = [[UIView alloc] initWithFrame:CGRectInset(self.bounds,   self.bounds.size.width/8, self.bounds.size.height/8)];

    // Add the container in the Collection View Cell's contentView container
    [self.contentView addSubview:insetView];

    // Initialize the imageView, customize its appearance, then add it in the insertView
    self.imageView = [[UIImageView alloc] initWithFrame:CGRectMake(0, 0, insetView.frame.size.width, insetView.frame.size.height)];
    self.imageView.backgroundColor = [UIColor clearColor];
    float dim = MIN(self.imageView.bounds.size.width, self.bounds.size.height);
    self.imageView.clipsToBounds = YES;
    self.imageView.layer.cornerRadius = dim/9;
    self.imageView.layer.opacity = 1.0;
    self.imageView.layer.borderColor = [UIColor lightGrayColor].CGColor;
    self.imageView.layer.borderWidth = 1.0;
    self.imageView.userInteractionEnabled = YES;
    [insetView addSubview:self.imageView];

   // Initialize the label, customize its appearance, then add it in the insertView
   self.label = [[UILabel alloc] initWithFrame:CGRectMake(0, 100, insetView.frame.size.width, insetView.frame.size.height - 59)];
   self.label.textAlignment = NSTextAlignmentCenter;
   self.label.numberOfLines = 2;
   self.label.lineBreakMode = NSLineBreakByWordWrapping;
   self.label.clipsToBounds = YES;
   self.label.textColor = [UIColor darkGrayColor];
   self.label.font = [UIFont boldSystemFontOfSize:15];
   self.label.layer.opacity = 1.0;
   [insetView addSubview:self.label];

   // Initialize the deleteButton
   self.deleteButton = [[UIButton alloc] initWithFrame:CGRectMake(frame.size.width/16, frame.size.width/16, frame.size.width/4, frame.size.width/4)];

   CGRect buttonFrame = self.deleteButton.frame;

   // Create a red circle image with a white crosshair
   UIGraphicsBeginImageContext(buttonFrame.size);
   CGFloat sz = MIN(buttonFrame.size.width, buttonFrame.size.height);
   UIBezierPath *path = [UIBezierPath bezierPathWithArcCenter:CGPointMake(buttonFrame.size.width/2, buttonFrame.size.height/2) radius:sz/2-MARGIN startAngle:0 endAngle:M_PI * 2 clockwise:YES];
   [path moveToPoint:CGPointMake(MARGIN, MARGIN)];
   [path addLineToPoint:CGPointMake(sz-MARGIN, sz-MARGIN)];
   [path moveToPoint:CGPointMake(MARGIN, sz-MARGIN)];
   [path addLineToPoint:CGPointMake(sz-MARGIN, MARGIN)];
   [[UIColor redColor] setFill];
   [[UIColor whiteColor] setStroke];
   [path setLineWidth:3.0];
   [path fill];
   [path stroke];
   deleteButtonImg = UIGraphicsGetImageFromCurrentImageContext();
   UIGraphicsEndImageContext();

   // Add the red circle image in the deleteButtonImg object
   [self.deleteButton setImage:deleteButtonImg forState:UIControlStateNormal];
   [self.contentView addSubview:self.deleteButton];
 }
  // Return the newly created Collection View Cell to its reciever, which is a Collection View
  return self;
}

- (void)startShakingIcons
{
  CABasicAnimation *shakeAnim = [CABasicAnimation animationWithKeyPath:@"transform.rotation"];
  float startAngle = (-2) * M_PI/180.0;
  float stopAngle = -startAngle;
  shakeAnim.fromValue = [NSNumber numberWithFloat:startAngle];
  shakeAnim.toValue = [NSNumber numberWithFloat:3 * stopAngle];
  shakeAnim.autoreverses = YES;
  shakeAnim.duration = 0.2;
  shakeAnim.repeatCount = HUGE_VALF;
  float timeOffset = (float)(arc4random() % 100)/100 - 0.50;
  shakeAnim.timeOffset = timeOffset;

   // Create a layer, then add animation to it
   CALayer *layer = self.layer;
   [layer addAnimation:shakeAnim forKey:@"shaking"];
}

- (void)stopShakingIcons
{
  CALayer *layer = self.layer;
  [layer removeAnimationForKey:@"shaking"];
  // Hide all delete buttons
  self.deleteButton.hidden = YES;
}
@end
Add Code in The DrinkRecipesViewController Files
What we have to do now is add these statements in the DrinkRecipesViewController.h file.
#import <UIKit/UIKit.h>
#import "RecipeDetailViewController.h"
#import "RecipeCell.h"
#import "SDWebImage/UIImageView+WebCache.h"

@interface DrinkRecipesViewController : UIViewController

@property(nonatomic, weak) IBOutlet UISearchBar *searchBar;
@property(nonatomic, weak) IBOutlet UICollectionView *collectionView;
@property(nonatomic, strong) NSMutableArray *searchResults;
@property (strong, nonatomic) NSMutableArray *drinkList;
@property (strong, nonatomic) NSArray *recipeSelectedArray;
@property (readwrite, nonatomic) BOOL isSearchOn;
@property (readwrite, nonatomic) BOOL shouldAnimate;
@property (strong, nonatomic) RecipeCell *icon;

@end
Ok, you’re ready to add code in the DrinkRecipesViewController.m file to implement system tasks listed above. So click the DrinkRecipesViewController.m file and enter this code in the ViewDidLoad method.
- (void)viewDidLoad
{
  [super viewDidLoad];

  // Register our RecipeCell class with the Collection View so we can use its properties and methods
  [self.collectionView registerClass:[RecipeCell class] forCellWithReuseIdentifier:@"Cell"];

  // Open the plist file and add its content in the drinkList array
  NSString *plistFilePath = [[NSBundle mainBundle] pathForResource:@"DrinkList" ofType:@"plist"];
  self.drinkList = [NSMutableArray arrayWithContentsOfFile:plistFilePath];

  // Set the Collection View to display a background image
  self.collectionView.backgroundView = [[UIImageView alloc] initWithImage:[UIImage imageNamed:@"leather.png"]];
}
Now, run the application and the DrinkRecipes view will now look like this:

Connect The Collection View’s Data Source and Delegate Outlet
What you have to do now is return to the storyboard file to connect the Collection View’s data source and delegate outlet to the Drink Recipes View Controller.
- Click the Document Outline icon to show it.
- Expand the Drink Recipes View Controller tab.
- Control-drag from the Collection View to the Drink Recipes View Controller. Release your mouse then select dataSource from the pop-up menu.

- Repeat step 3 to connect the Collection View’s delegate property to the Drink Recipes View Controller.
By connecting the Collection View’s dataSource property to the Drink Recipes View Controller, methods of the UICollectionViewDataSource protocol we’ll implement in the DrinkRecipesViewController.m file will work. The same is true for the UICollectionViewDelegate protocol’s methods.
Implement The Collection View’s Data Source Methods
What you have to do now is implement these data source methods of the UICollectionViewDataSource protocol in the DrinkRecipesViewController.m file. They are responsible for displaying Collection View Cells in the Collection View.
- (NSInteger)collectionView:(UICollectionView *)view numberOfItemsInSection:(NSInteger)section
{
  if (self.isSearchOn)
    return self.searchResults.count;
  else
    return self.drinkList.count;
}

- (NSInteger)numberOfSectionsInCollectionView: (UICollectionView *)collectionView
{
  return 1;
}

- (UICollectionViewCell *)collectionView:(UICollectionView *)cv cellForItemAtIndexPath:(NSIndexPath *)indexPath
{
  // Initialize the reusable Collection View Cell called icon
  _icon = [cv dequeueReusableCellWithReuseIdentifier:@"Cell" forIndexPath:indexPath];
  NSArray *recipeArray;
  if (self.isSearchOn) {
    // Search IS on
    recipeArray = [[NSArray alloc] init];
    recipeArray = [self.searchResults objectAtIndex:indexPath.row];
  } else {
    // Search ISN'T on
    recipeArray = [[NSArray alloc] init];
    recipeArray = [self.drinkList objectAtIndex:indexPath.row];
  }
  // These statements feth a recipe image from the remote server and place it in the Collection View Cell's imageView object
  NSString *imageUrl = recipeArray[1];
  NSURL *url = [[NSURL alloc] initWithString:imageUrl];
  [_icon.imageView setImageWithURL:url placeholderImage:[UIImage imageNamed:@"placeholder.png"]];

  // Add a recipe name in the label object
  _icon.label.text = recipeArray[0];

  // Configure the deleteButton's action method
  [_icon.deleteButton addTarget:self action:@selector(delete:) forControlEvents:UIControlEventTouchUpInside];

  // Hide or show the deleteButton in the Collection View's contentView object
  if (self.shouldAnimate == NO) {
    _icon.deleteButton.hidden = YES;
  } else {
    _icon.deleteButton.hidden = NO;
  }
  // Return the Collection View Cell
  return _icon;
}
As you can see Collection View’s data source methods are very much like the Table View’s data source methods. Since we connected the Collection View’s data source property to the DrinkRecipesViewController Interface Builder, the methods will work.
numberOfSectionsInCollectionView:
This is optional data source method and it returns the answer to this question: How many sections does the collection view contain? If we didn’t implement this method in the DrinkRecipesViewController.m file, then the collection view uses a default value of 1.
numberOfItemsInSection:
This is a required data source method and it returns the answer to this question: How many items there are in a section of the Collection View? The if statement we added in the method is responsible for figuring out and returning the answer to that question. It check to see if the user is searching for a drink recipe; if so, then count and return the total number of elements there are in the searchResults array. If the user is not searching for a drink recipe then count and return the total number of elements there are in the drinkList array. The else statement will return the integer 33. That’s because there are 33 array items in the plist file.
cellForItemAtIndexPath:
This is a required data source method and it return the answer to this question: For a given section or item, what views should be used to display the corresponding content? Code we entered in the method basically check to see if the user is searching for a drink recipe by name, if so then display content of the searchResults array, in the Collection View Cells. If the user is not searching for a drink recipe, then display content of the drinkList array, in the Collection View Cells. The final piece of code we entered in the method determines whether delete buttons are shown or not shown in the upper left corner of the Collection View.
Run The Application
When you run the application now, you’ll see output shown in Figure A below. Awsome! We have data and we can scroll the view. Notice how the iPad screen look very much like our sketch of the Drink Recipes View Controller screen.
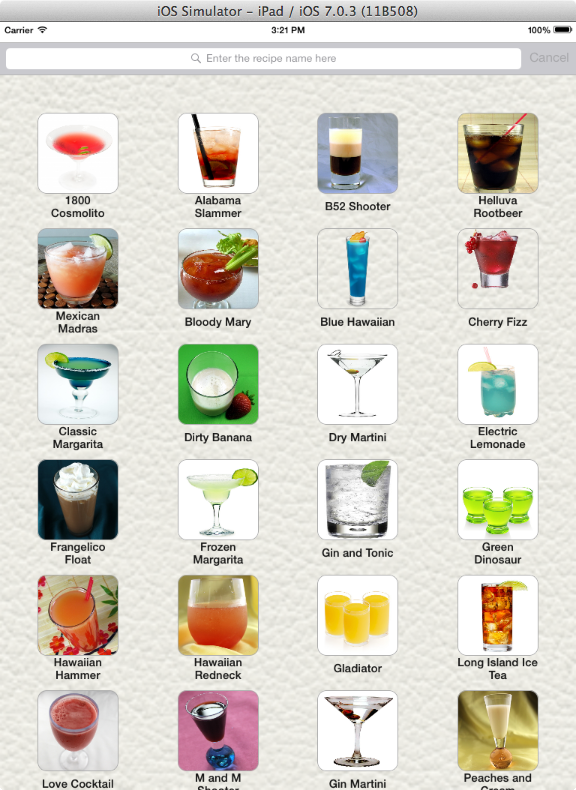 |
|
| Figure A: The Drink Recipes View Controller screen in the iPad Simulator | Figure B: Sketch of the Drink Recipes View Controller screen |
As you can see, nothing happens when you click (tap) or long-click (long-press) a recipe icon. We’ll have to add more code in the DrinkRecipesViewController.m file to fix that. The Search Bar doesn’t work either. We’ll have to add code in the file to fix that as well.
That’s it! We’ve implemented all of the systems tasks, which are these:
- Load an image in the Collection View’s background.
- Register the RecipeCell class with the Collection View.
- Fetch all array items from the plist file and load them in a mutable array.
- Download drink recipes images and load them in the Collection View Cells.
- Display recipe names below each Collection View Cell.
- Display the Drink Recipes View in the iPad Simulator.
We’ll continue developing the BevUp application next week. Until then, happy coding ! 🙂