Recently, a reader sent me an email. He wanted to know if I could create a tutorial on how to load a different tableView from a segmented control. So in this tutorial I answer the email sender’s question by creating an iOS application called sc-tblvw.
| Code presented on this page assume you are using Xcode 7.0 and Swift version 2.0. So if you are using an older or newer version of Swift, it may produce errors. Fix them by using Xcode’s Fix-it tool. Also, I assume you aren’t a newbie to the Swift Programming Language and you know your way around Xcode Integrated Development Editor. |
The application’s storyboard will have five scenes and five corresponding class files. The initial scene will have only a Segmented Control with 3 segments (buttons). When the app user tap a button on the Segmented Control, the app will display a view containing a Label, a back button, and a table view. Further more, when the user tap a cell on the fourth scene’s table view, the app will pass the selected cell’s photo and caption to the fifth scene’s view controller. That view controller will display the selected table view cell’s photo and caption on its view.
At the end of this tutorial, the application will look and function like the one shown in this QuickTime movie.
Step 1: Create a new project
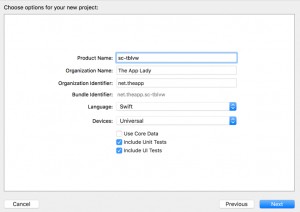
To start things off, launch Xcode and create a new project (⌘ + N). Select the “Single View Application” template, configure the project options screen so it look like Figure 1, and save the project in the Interactive Swift Programming folder.
Step 2: Add a Segmented Control on the storyboard’s canvas
Since the “sc-tblvw” project will load a different view controller scene from a segmented control, you have to configure the initial storyboard scene by dragging a Segmented Control from the Object Library and drop it on the scene’s canvas and resize it. Figure 2 shows attributes to configure for the Segmented Control. Select the scene object and “Add Missing Constraints” to the “wAny hAny” size class.
Step 3: Rename the View Controller class
In the Identity inspector, rename the default ViewController class file to MainViewController.swift. Change the class header to match the file’s name as well. Now, reconnect the class to the initial scene. Next, use the Assistant Editor to create this IBOutlet for the Segmented Control.
Step 4: Add four class files in the project
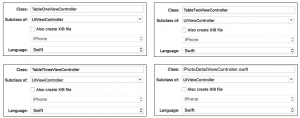
Add four “Cocoa Touch Class” class files in the project and provide options shown in Figure 4, for each one.
Step 5: Add four View Controllers on the storyboard
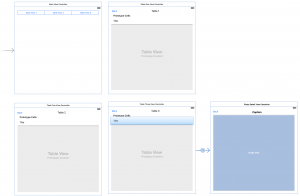
Add four View Controllers on the storyboard and configure them so they look like Figure 5 below. Next, add Missing Constraints to each scene’s object. Create a segue for the fourth scene’s table view cell. Select the segue and set its Identifier attribute in the Attributes inspector to show-image. Next, select the fourth scene’s table view and connect its dataSource and delegate outlet.
Set the Photo Detail View Controller scene’s image view’s Mode attribute to Aspect Fit. Next, create IBOutlet properties for the scene’s controls, via the Assistant editor. In the Photo Detail View Controller class file they should look like this:
@IBOutlet weak var imageView: UIImageView!
@IBOutlet weak var captionLabel: UILabel!
For the second, third, and fourth storyboard scene; you have to set their Storyboard ID attributes. Why? Because you’ll be referencing them in code. For example, to set the second scene’s Storyboard ID, you’ll have to:
- select the scene’s object.
- In the Identity inspector, enter table1 in the Storyboard ID field.
Repeat above steps to set the third and fourth scene’s Storyboard ID as follows:
- table2
- table3
Step 6: Add code in the MainViewController class
What you have to do now is add this segmentSwitch() function, in the MainViewController class.
@IBAction func segmentSwitch(sender: UISegmentedControl) {
  switch segmentedControl.selectedSegmentIndex {
    case 0:
      let vc = self.storyboard!.instantiateViewControllerWithIdentifier("table1") as! TableOneViewController
      self.presentViewController(vc, animated: true, completion: nil)

    case 1:
      let vc = self.storyboard!.instantiateViewControllerWithIdentifier("table2") as! TableTwoViewController
      self.presentViewController(vc, animated: true, completion: nil)

    case 2:
      let vc = self.storyboard!.instantiateViewControllerWithIdentifier("table3") as! TableThreeViewController
      self.presentViewController(vc, animated: true, completion: nil)

    default: // Do nothing
      break;
  }
}
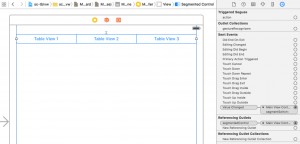
Return to the storyboard’s Main View Controller scene and hook up the segmentSwitch() function to the Segmented Control’s value change sent event.
When the user tap a button on the Segmented Control, the segmentSwitch() function is fired. Code you entered in it basically present a view controller view’s on the device’s screen. For example; tapping the third button on the Segmented control display the TableThreeViewController’s view on the device/simulator’s screen.
Next, enter this unwind segue function in the class MainViewController class and connect it to each scene’s Exit object. You do that by control-dragging from the Back button to the Exit object.
@IBAction func unwindToMainViewController(segue: UIStoryboardSegue) {
}
By setting up an unwind segue function for the scenes’ Back buttons and connecting them to their respective Exit objects, the app will “unwind” back to the the Main view (Source ViewController). For this event to occur, the app user will have to tap a view’s Back button. Take a look at Figure 6; it shows the segue and unwind segue event.
Optionally, you can implement the viewWillAppear() function in the MainViewController class and enter code shown below in it. The code deselect the third button on the Segmented Control, every time the initial view appear on the device’s screen. Remember, the initial view is the one that have the arrow pointing to it, in the storyboard.
override func viewWillAppear(animated: Bool) {
  if segmentedControl.selectedSegmentIndex == 2 {
    segmentedControl.selectedSegmentIndex = -1
  }
}
That’s all the code you have to add in the MainViewController class.
Step 7: Add code in the TableThreeViewController class
The TableThreeViewController class is connected to the fourth storyboard scene; therefor, you have to enter code in the scene’s class to:
- populate the scene’s table view cells with photo image names
- pass the selected photo name and caption to the DetailViewController class.
Here’s the code to implement both operations in the class:
import UIKit
let cellId = "cell"

class TableThreeViewController: UIViewController {
    @IBOutlet weak var tableView: UITableView!
    var tableDataSource = [String]()
    var captionList = [String]()

    override func viewDidLoad() {
        super.viewDidLoad()

        // Initialize both arrays
        tableDataSource = ["puppy-dog.jpeg",
            "baby-kitten.jpeg",
            "baby-rabbit.jpeg",
            "baby-turtle.jpeg"]

        captionList = ["Aww! This baby puppy is such a cutie!",
            "Adorable kitten. Aww!",
            "Cute baby rabbit",
            "MMM... Strawberry!"]
    }
    // MARK: - Navigation

    override func prepareForSegue(segue: UIStoryboardSegue, sender: AnyObject?) {
        if segue.identifier == "show-image" {
            let destination = segue.destinationViewController as! PhotoDetailViewController
            let indexPath = tableView.indexPathForSelectedRow
            let selectedPhoto = tableDataSource[indexPath!.row]
            destination.selectedPhoto = selectedPhoto
            destination.caption = captionList[indexPath!.row]
        }
    }

    // MARK: - TableView dataSource functions

    func numberOfSectionsInTableView(tableView: UITableView) -> Int {
        return 1
    }

    func tableView(tableView: UITableView, numberOfRowsInSection section: Int) -> Int {
        return tableDataSource.count
    }

    func tableView(tableView: UITableView, cellForRowAtIndexPath indexPath: NSIndexPath) -> UITableViewCell {
        let cell = tableView.dequeueReusableCellWithIdentifier(cellId, forIndexPath: indexPath)
        cell.textLabel?.text = tableDataSource[indexPath.row]
        return cell
    }
}
Step 8: Add code in the PhotoDetailViewController class
You’ve already entered code in the fourth scene’s class (TableThreeViewController) class to pass the selected table view cell’s photo and caption to the PhotoDetailViewController class. What you have to do now, is enter code in the DetailViewController class to pretty much load:
- the selected photo in the Detail View Controller view’s imageView control
- the selected caption in the Detail View Controller view’s Label control
Here’s the code to implement above operations in the DetailViewController class.
var index = Int()
var selectedPhoto = String()
var caption = String()

override func viewDidLoad() {
  super.viewDidLoad()
  imageView.image = UIImage(named: selectedPhoto)!
  captionLabel.text = caption
}
Step 9: Add photos in the project’s Asset folder and run the app
That’s it. You’ve are pretty much done implementing the tutorial’s goal in the project and then some. The only thing left to do now is, add these photos in the project’s Assets folder and run the app on your real device and/or the Simulator.
 |
 |
 |
 |
Say you were to run the app on the iPhone 6 Simulator; it should look and function as the QuickTime movie shown at the beginning of this tutorial.
That’s it! Comments are welcome! 🙂


One response
Great article and i’m happy for you being a home mom who’s willing to stay up to date with technology and share knowledge with the world. Cheers enjoyed read your article it was worth it.