
If you are a new visitor to our site, please read the Getting Started guide.
The page view controller is a container controller that allow the app user to navigate between pages of content. You can configure these attributes of the page view controller in Interface Builder or in code.
- The orientation of the page views – vertical or horizontal
- The transition style – page curl transition style or scrolling transition style
- The location of the spine – only applicable to page curl transition style
- The space between pages – only applicable to scrolling transition style
Now, in order to make the PageViewController work, you’ll have to do the following:
- Conform your class to the UIPageViewControllerDataSource protocol, like this:
@interface RootViewController : UIViewController <UIPageViewControllerDataSource> - Implement these dataSource methods of the UIPageViewControllerDataSource protocol, in the RootViewController class.
Required Data Source Methods
viewControllerBeforeViewController – This method tell the app to decrement the view controllers array’s index, then return the previous view controller.
viewControllerAfterViewController – This method tell the app increase the view controllers array’s index, then return the next view controller.
Optional Data Source Methods
presentationIndexForPageViewController – This method inform the page control which dot must be selected by default. Dots in the page control are zero-based; so, the first dot’s index number is 0, the second dot’s index number is 1, and so forth.
presentationCountForPageViewController – This method tell the page control the number of dots to display in the page control.
Take a look at this image, it shows how the page view controller and its dataSource methods work behind the scenes to load a view controller in the page view controller’s View Port.

The Page View Controller Application
To learn how to use the page view controller in an iOS application, you’ll use the Xcode application I’ve already created for this workshop. Upon completion, it will enable the user to view pages of photos and captions. Now, I want you to click this image to download the Xcode project you will develop in this workshop.

Unzip the file, then drag and drop the Album Photo folder in the iOS7 Projects folder on your computer.
Once you’ve perform above tasks, the project navigation panel should look like the image shown in Figure 1 below. By the way, the application’s data model (see Figure 2 below) will be a mutable array and we’ll set it up in the RootViewController.m file’s viewDidLoad method.
 |
 |
| Figure 1 | Figure 2 |
As you can see in above image of the project Navigator panel, there are three class files and we’ll have to add code in all of them.
Step 1: Add code in the AppDelegate implementation file
Add code shown below in the AppDelegate.m file’s didFinishLaunchingWithOptions: method.

Code you entered in the method customized the page control, so it’ll look like this:
![]()
Step 2: Modify the RootViewController header file’s code
I want you to modify the RootViewController.h file to what’s shown in this image.

What you did is conformed the RootViewController class to the UIPageViewControllerDataSource protocol, so dataSource methods you’ll add implement the class’s implementation file will work. You declared two properties, The pageViewController property is for creating a page view controller scene in the RootViewController scene. The page view controller scene will serve as a container for the Page Data View controller scene. The second property variable is for holding data that’ll appear in the Page Data View Controller scene’s controls.
Step 3: Add Code in RootViewController implementation file
Click the RootViewController.m file and this statement at the top of the file.
#import "DataPageViewController.h"
Next, add code shown in the image below.

For now, just ignore the warning (yellow exclamation) and fatal error (red exclamation) message the compiler generated.
You imported the DataPageViewController.h file. Code you entered in the viewDidLoad method populated the pageDataSource array with ten arrays. Next you created a Page View Controller scene and set these attributes:
- transition style – you set it to scroll
- navigation orientation – you set it to horizontal
- dataSource – you set it to self, which is the RootViewController class
- navigation direction – you set it to forward
- frame height – you reduce it by 50 points so it doesn’t obstruct the RootViewController’s Label control
You created an array of view controllers initialize it with the Data Page View Controller scene, then added it in the Page View Controller scene’s container-see code line 36-42. You added the Page View Controller scene in the Root View Controller scene’s container-see code line46-48. The final statement in the method set Root View Controller scene’s back ground color to black.
Step 4: Implement the createViewControllerAtIndex method
What you need to do is implement the method shown below, in the RootViewController.m file. By doing that, the fatal error message on code line 36 will go away.

Code you entered in the method basically create a Data Page View Controller scene and return it to the caller of the method, which is the RootViewController’s viewDidLoad method.
You need to declare these properties in the DataPageViewController.h file, to make the fatal error messages go away.
@property NSArray *pageDataArray;
@property NSUInteger pageIndex;
Step 5: Implement methods of the UIPageViewControllerDataSource protocol
Here is the code to implement required and optional dataSource methods of the UIPageViewControllerDataSource protocol.

In order for the Page View Controller scene to work, you implemented these required methods of the UIPageViewControllerDataSource protocol: viewControllerBeforeViewController and viewControllerAfterViewController. Code you entered in both methods basically control which view controller to return to the caller of the method. Take a look at this image to see what I mean.
When the user swipe right, the viewControllerBeforeViewController method is fired. Code in that method decrease the index variable’s value by 1 and return the previous view controller to its caller. When the user swipe left, the viewControllerAfterViewController method is fired. Code in that method increase the index variable’s value by 1 and return the next view controller to its caller.
Notice how the createViewControllerAtIndex method was used in each method’s return statement. As you already know, the that method creates a view controller (or scene) and return it.
The last two methods you implemented in the RootViewController.m file are optional methods of the UIPageViewControllerDataSource protocol. The presentationCountForPageViewController: method’s job is to inform the page control which dot must be selected by default. The presentationIndexForPageViewController: method’s job is to tell the page control the number of dots to display in the page control. Since the pageDataSource array was initialize with 10 objects, the page control will display 10 dots.
Step 6: Run The Application
You’ve entered enough code in the RootViewController class to make its scene functional; so go ahead and run the application and you’ll see output shown in this image.

Step 7: Hide the status bar
What you need to do is add this method in the RootViewController.m file, which hides the Root View Controller scene’s status bar.
- (BOOL)prefersStatusBarHidden
{
  return YES;
}
Step 8: Add code in the DataPageViewController class
Add these IBOutlet properties in the DataPageViewController.h file, then connect them to the Data Page View Controller scene’s properties, in Interface Builder.

Switch to the DataPageViewController.m file and add code shown below in the viewDidLoad method.

Code you entered in the method basically set the Data Page View Controller scene’s image view and label controls with elements of the pageDataArray. You also set the scene’s background color to light gray.
Step 9: Run The application
Before running the application, adjust the Data Page View Controller scene’s Label control in Interface Builder to the same width as the image view control. Set its Alignment attribute center.
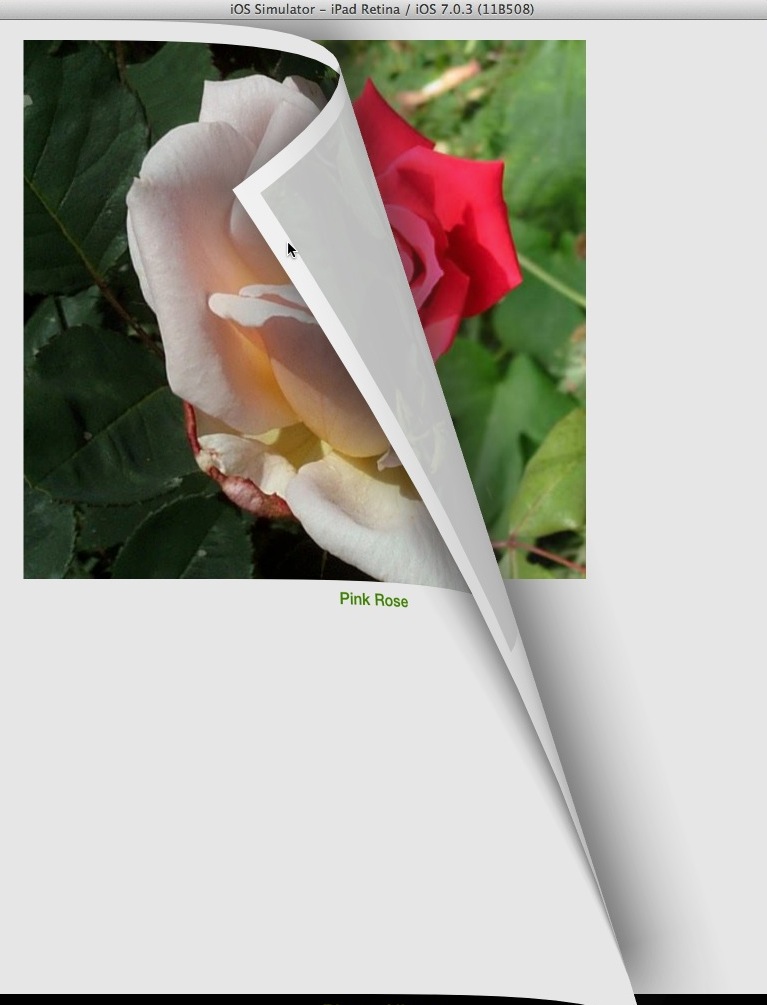
Now, run the application. The application loaded the Data Page View Controller scene in the Root View Controller scene; resulting output shown in the image below.

That’s it, we are done. Now, take a look at this diagram. It shows how the application’s scenes work. Every time the application is launched, the Root View Controller scene is loaded in the simulator’s window. It is a container for two other scenes, as shown in the diagram below. In fact all three scenes in the diagram are containers for holding one or more scenes.

If you want to see the page curl, you’ll have to do the follow:
- Click the RootViewController.m file and go to the viewDidLoad method.
- Replace code line 30-32 with this one:
self.pageViewController = [[UIPageViewController alloc]
initWithTransitionStyle:UIPageViewControllerTransitionStylePageCurl
navigationOrientation:UIPageViewControllerNavigationOrientationHorizontal options:nil];
- Run the application and swipe the simulator’s screen to see the page curl to the next page or the previous page.
That’s the end of the workshop.