
Today you will enter code in the Nifty app’s ProductViewController.swift file to implement only the first three In-App Purchased tasks shown on this card.

Before, you get started, I assume you read part 1, part 2, and part 3 of the tutorial. Also, I assume you created a new branch called part4 from the current branch; which is called part2.
Task 1
The Nifty App Store will have to fetch product identifiers from the bundle’s plist file and load them in a set called productIdentifiers.

To implement task 1, modify ProductViewController class so it looks like this:
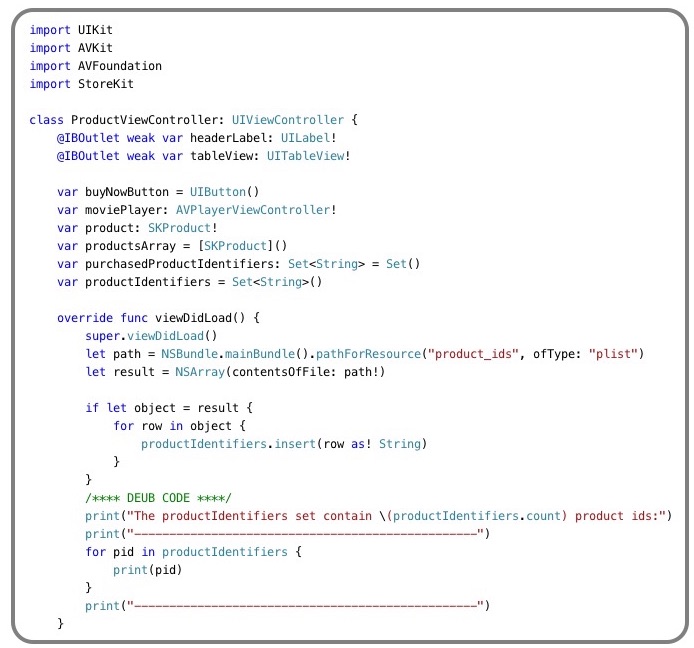
The code you entered in the ProductViewController class does the following:
- Import the StoreKit module
- Change the data type of two variables-product and productsArray
- Declare two sets-purchasedProductIdentifiers and productIdentifiers
- Populate the productIdentifiers set with product ids fetched from the app bundle’s plist file
The debug code you entered in the viewDidLoad function is optional. It basically print in Xcode’s console, the total number of members that was inserted in the productIdentifiers set. As for the for loop, it convert members of the productIdentifiers set to string objects and print them in Xcode’s console. You will see this output in Xcode console when you run the Nifty-IAP app say, on your iPhone device.
The productIdentifiers set contain 4 product ids:
-------------------------------------------------
net.theapplady.Nifty_Video4
net.theapplady.Nifty_Video2
net.theapplady.Nifty_video1
net.theapplady.Nifty_Video3
-------------------------------------------------
Task 2
You have to enter code in the ProductViewController.swift class file to request product information from Apple’s App Store and store them in the tableView’s data source. The tableView’s data source is an array variable called productsArray; which you declared in the ProductViewController class. Here is a diagram and description of task 2.

Diagram 1: Request product information
- The Nifty App Store send a product info request to StoreKit
- StoreKit relay the request to the App Store
- The App Store in turn return a product response (product array) to StoreKit
- StoreKit pass the product response to the Nifty App Store
- The Nifty App Store insert the product response in the productsArray variable
Now, you have to make several changes in the ProductViewController class to implement task 2. Start by conforming the class to the SKProductsRequestDelegate protocol:
class ProductViewController: UIViewController, SKProductsRequestDelegate {
Next, enter this statement in the videDidLoad() function.
override func viewDidLoad() {
  ...
  SKPaymentQueue.defaultQueue().addTransactionObserver(self)
}
Above statement register the ProductViewController class as an observer of notifications StoreKit will send and receive from the App Store. For example, StoreKit will send a SKProduct request notification to the App Store. StoreKit will receive a SKProduct response from the App Store and pass it to the Nifty App Store; which is the ProductViewController class.
Next, scroll to the end of the ProductViewController class because you will be adding several functions there. Here is the first one to put in the class.
func requestProductData() {
    if SKPaymentQueue.canMakePayments() {
        let productRequest = SKProductsRequest(productIdentifiers:self.productIdentifiers)
        productRequest.delegate = self
        productRequest.start()
        print("Product request was sent to the App Store.")
    } else {
        let alertView = UIAlertController(title: "In-App Purchases Not Enabled",
                        message: "Please enable In-App Purchase in Settings",
                        preferredStyle: .Alert)

        let settingsButton = UIAlertAction(title: "Settings", style: .Default) {
            UIAlertAction in
            alertView.dismissViewControllerAnimated(true, completion: nil)
            let url: NSURL? = NSURL(string: UIApplicationOpenSettingsURLString)

            if url != nil {
                UIApplication.sharedApplication().openURL(url!)
            }
        }

        let okButton = UIAlertAction(title: "OK", style: .Default) {
            UIAlertAction in
            alertView.dismissViewControllerAnimated(true, completion: nil)
        }

        alertView.addAction(settingsButton)
        alertView.addAction(okButton)

        dispatch_async(dispatch_get_main_queue(), {
            self.presentViewController(alertView, animated: true, completion: nil)
        })
    }
}
Next, call the requestProductData() function in the viewDidLoad class.
override func viewDidLoad() {
  ...
  requestProductData()
}
The if statement in the user defined function, requestProductData() check to see whether or not “In-App Purchases” is enabled on the user’s device. If the user did enable In-App Purchase on his/her iOS device, statements in the if block are executed; they do the following:
- Create a request object and initialize it with productIdentifiers set.
- Make the ProductViewController class a delegate of the productRequest object.
- Call the productRequest object’s start() function. This function basically tell StoreKit to go ahead and send the productRequest to the App Store.
If the user didn’t enable In-App Purchase on his/her iOS device, statements in the else block are executed; they do the following:
- Create an instance of the UIAlertController class called alertView.
- Create an action button called settingsButton with an action block. Code you entered in the block dismiss the alertView and launch the Settings application on the user’s device; so she can enable In-App Purchase.
- Create an another action button called okButton with an action block. Code you entered in the block just dismiss the alertView.
- Added both action buttons to the alertView.
- In the dispatch_async() block, present the alertView. The dispatch_async() block delay presentation of the alertView. If you didn’t do this, Xcode will spit it an error in the console.
Since you made the ProductViewController class a delegate of the SKProductRequestDelegate protocol, you have to implement this required delegate function of the protocol in the class.
func productsRequest(request: SKProductsRequest, didReceiveResponse response: SKProductsResponse) {
    var products:[SKProduct] = response.products

    if (products.count != 0) {
        for i in 0 ..< products.count {
            self.product = products[i]
            self.productsArray.append(product!)
        }
        print("There are \(productsArray.count) elements in the productsArray.")
        self.tableView.reloadData()
    } else {
        showAlertView("No products found")
    }

    let invalidProductIds = response.invalidProductIdentifiers

    if invalidProductIds.count != 0 {
        var message = [String]()
        message.append("No products found for the following product id(s):\n")

        for pid in invalidProductIds {
            message.append(pid)
        }

        showAlertView(message.joinWithSeparator("\n"))
    }
}
The didReceiveResponse() function basically insert products the App Store returned in the tableView’s data source; which is an array variable called, productsArray-see Diagram 1 above. The didReceiveResponse() function perform other tasks; such as these:
- Print in Xcode console, the number of elements that’s in the productsArray.
- Refresh the tableView so products details show up in its cells.
- Show a message in an alertView if the products variable is empty.
- Assign invalidProductIdentifiers, if any, to a constant called invalidProductIds.
- If the constant is not empty, construct a message and show it in an alertView. An example of what it will look like on your iOS device’s screen is shown below.

Invalid product ids alert view
What you have to do now is conform the ProductViewController class to the SKPaymentTransactionObserver protocol and implement this delegate function of the protocol in the ProductViewController class. Once you’ve done these tasks, the fatal error Xcode issue will disappear.
func paymentQueue(queue: SKPaymentQueue, updatedTransactions transactions: [SKPaymentTransaction]) {
}
The updatedTransactions() function’s job is to tell its observer; which is the ProductViewController class, that one or more transactions have been updated. Code you’ll enter in the function will process each transaction by examining its transactionState property. Later on you’ll add code in the updateTransactions() function.
Task 3
What you have to do now is present the store on the ProductView. To do that, you’ll have to modify code in the tableView cellForRowAtIndexPath() function so it look like this:
func tableView(tableView: UITableView, cellForRowAtIndexPath indexPath: NSIndexPath) -> UITableViewCell {
    let cell = tableView.dequeueReusableCellWithIdentifier("cell", forIndexPath: indexPath)
    product = productsArray[indexPath.row]
    cell.textLabel!.text = product!.localizedTitle
    cell.detailTextLabel!.text = "price " + formatPrice()

    buyNowButton = UIButton(frame: CGRect(x: 0.0, y: 0.0, width: 77.0, height: 30.0))
    buyNowButton.tag = indexPath.row
    buyNowButton.setTitleColor(view.tintColor, forState: .Normal)
    buyNowButton.setTitle("Buy Now", forState: .Normal)
    buyNowButton.titleLabel!.font = UIFont(name: "Times New Roman", size: 18)
    buyNowButton.layer.borderWidth = 1.0
    buyNowButton.layer.cornerRadius = 4.0
    buyNowButton.layer.borderColor = buyNowButton.tintColor?.CGColor
    buyNowButton.addTarget(self, action: #selector(ProductViewController.buyNowButtonTapped(_:)), forControlEvents: .TouchUpInside)
    cell.accessoryView = buyNowButton

    if productPurchased(product!.productIdentifier) {
        cell.accessoryType = .Checkmark
        cell.accessoryView = nil
    } else {
        cell.accessoryType = .None
    }
    return cell
}
The first set of statements you entered in the cellForRowAtIndexPath() function initialized the product array variable and set two properties of the tableView cell by assigning them properties of the product object. The custom function, formatPrice pretty much format the product object’s price property.
The second set of statements set a few properties of the BuyNowButton and configure it so it look like a typical App Store button. Attached an IBAction function called buyNowButtonTapped to the buyNow button. Added the buyNowButton in the cell’s accessoryView.
The final code you entered in the cellForRowAtIndexPath() function is an if-else statement and a statement that return the configured cell. Now, the if-else statement works like a switch to display either a Buy Now button or a checkmark in the cell’s accessoryView. The object that’s displayed in the accessoryView depends on the boolean value the user defined function, productPurchased() returns. If the function returns true, the checkmark object is displayed in the cell’s accessoryView; otherwise, the Buy Now button is displayed in the cell’s accessoryView. The if-else code will make more sense when you examine the productPurchased() function’s code and run the app on your iPhone device.
Ok, here’s the code to implement the custom functions and the buyNowButton’s IBAction function. Put them at the end of the ProductViewController class.
func formatPrice() -> String {
    let numberFormatter = NSNumberFormatter()
    numberFormatter.formatterBehavior = .Behavior10_4
    numberFormatter.numberStyle = .CurrencyStyle
    numberFormatter.locale = product.priceLocale

    let formattedPrice = numberFormatter.stringFromNumber(product.price)!
    return formattedPrice
}

func productPurchased(productIdentifier:String) -> Bool{
    if purchasedProductIdentifiers.contains(productIdentifier) {
        return true
    }
    return false
}

func buyNowButtonTapped(sender: UIButton) {
    NSLog("The cell's Buy button tag is %i", sender.tag)
}
As you already know, the formatPrice() function format a product price by using the product’s local price; which was returned by the App Store.
The productPurchased() function check to see if a productIdentifier exists in the purchasedProductIdentifiers set. If that’s the case, the function returns the Swift boolean value true to its caller; otherwise, the function returns false to its caller. Now, when the user successfully purchase a product in the Nifty app store, it will add its product id in the purchasedProductIdentifiers set.
As for the buyNowButtonTapped() function, it is connected to the tableView cells’ buyNowButton object; which you configured in the cellForRowAtIndexPath() function. You entered a statement in the buyNowButtonTapped() function to display the tableView cell’s Buy Now button’s tag number in Xcode’s console. Later on you will enter statements in the function to initiate a payment request as a result of the user tapping the tableView cell’s Buy Now button.
Finally, make code in the prepareForSegue() function look like this:
override func prepareForSegue(segue: UIStoryboardSegue, sender: AnyObject?) {
    if segue.identifier == "showVideoPlayer" {
        var url = NSURL(string: "https://theapplady.net/wp-content/uploads/2016/03/old-film-count-down.mp4")!
        if let indexPath = self.tableView.indexPathForSelectedRow {
            let destination = segue.destinationViewController as! AVPlayerViewController

            // Set the url variable with an appropriate video url
            if indexPath.row == 0 {
                url = NSURL(string: "https://theapplady.net/wp-content/uploads/2014/12/Gnarls-Barkley-Crazy.mp4")!

            } else if indexPath.row == 1 {
                url = NSURL(string: "https://theapplady.net/wp-content/uploads/2016/03/taylor-swift-shake-it-off.mp4")!

            } else if indexPath.row == 2 {
                url = NSURL(string:"https://theapplady.net/wp-content/uploads/2016/03/adele-skyfall.mp4")!

            } else if indexPath.row == 3 {
                url = NSURL(string: "https://theapplady.net/wp-content/uploads/2016/03/adele-hello.mp4")!
            }

            // Initialize the AVPlayerViewController's player and play the video passed to it
            destination.player = AVPlayer(URL: url)
            destination.player?.play()
        }
    }
}
So far you’ve entered code in the ProductViewController class file to implement the first three tasks that’s on the In-App Purchase card which was shown at the beginning of today’s tutorial. Throughout this tutorial, I assume you have a provisioned iPhone device to test the Nifty-IAP project’s code. You cannot test In-Ap Purchase on the iOS Simulator.
Disable In-App Purchase on Your Device
Before you run the Nifty-IAP app on your iPhone device, I want you to disable In-App Purchases. Here are the steps to do that:
- Launch the Settings app on your iPhone device.
- Scroll down until you come to the General row and tap it.
- Scroll down until you come to the Restrictions row and tap it.
- On the Restrictions screen, the first row should say Disable Restrictions. If it doesn’t, tap that row and enter your four digit Restrictions Passcode. If you can’t remember it, you’ll have to reset your device to the factory settings and set the Restrictions Passcode.
- Scroll down until you come to the In-App Purchases row. Flick its switch to the off state. This action pretty much disable In-App Purchases on your iPhone device.
- Close the Settings app.
Log Out From Your Regular App Store Account
You have to tell Apple and the Nifty-IAP App that you want to use the sandbox environment to test the In-Purchase on your iPhone device and not charge your real account. To do that, you must log out from your regular App Store account, on your real device.
A sandbox environment is for testing In-App Purchase in the Nifty app store. This environment uses the infrastructure of the App Store but doesn’t process actual payments; however, a receipt is generated for a successful transaction.
Assuming you’ve already launch the Setting app on your iPhone device, do the following:
- Tap iTunes & App Store
- Tap your Apple ID
- Tap Sign Out
- Close the Settings app
Testing Task 1-3 Code
Now that you’ve disable In-App Purchase and log out of your regular app store account; you are ready to test code you implemented in the ProductViewController class, for task 1-3.
Start by hooking up your iPhone device to your Mac and select it from Xcode’s active scheme. Next, click the Run button in Xcode. When the Nifty-IAP app finish launching on your device, you will see an alert view asking you to sign in to iTunes Store-see figure a below. Go ahead and enter your sandbox tester email and password in the alert view’s fields and click the Ok button. You will see the In-App Purchase Not Enabled alert view on your device’s screen-see figure b below. Tap the Settings button and the Nifty-IAP app launch the Settings app on your device. Use it to enable In-App Purchase on your device.
 figure a |
 figure b |
Once you’ve enabled In-App Purchase on your iPhone device, the Settings app should look like figure c below. Tap the Back to Nifty-IAP button in the upper left corner of your device’s screen to return to the Nifty-IAP app.

figure c
In Xcode, terminate the app then run it again on your iPhone device. This time you will see the ProductView’ tableView’s cells populated with four products and four Buy Now buttons. What you are seeing is the Nifty app store.

Tap say, the second Buy Now button and you will see this output in Xcode console:
The productIdentifiers set contain 4 product ids:
-------------------------------------------------
net.theapplady.Nifty_Video4
net.theapplady.Nifty_Video2
net.theapplady.Nifty_video1
net.theapplady.Nifty_Video3
-------------------------------------------------
Product request was sent to the App Store.
There are 4 elements in the productsArray.
2016-04-23 12:13:38.234 Nifty-IAP[2646:2309687] The cell's Buy button tag is 1
As of now when you tap any cell in the tableView, the video will play in the AVPlayerViewController’s view. You will fix that soon enough.
You are done testing code you implemented in the ProductViewController class, for task 1-3; so terminate the app in Xcode and comment out the debug code in the viewDidLoad() function. Next, use Xcode’s Source Control/Commit comment to save changes you made to the project in the Git repository.
Thats all for today. Next week, you will add more code in the ProductViewController to implement task 4-7 that’s on the card presented at the beginning of today’s tutorial.